It is always fun when I put the zpoxy on to fill the pores. I get to see all of the color and grain pop. I still need to make and install a logo, but I will be spraying this weekend.
whoops there goes another bottle of Everclear.
October16th 2014
I have only a couple of more coats on the backs and sides and I am finished spraying. So far it all looks good. After 8 coats on the top I filled some gaps near the bindings and around the rosette, leveled the top some and sprayed 2 more coats. The back and sides were completely leveled during prep and pore fill so I have not leveled the back or sides while finishing but it looks really level and no gaps showing up so I will just sand level after the lacquer clears.
Cutting the pearl and ebony for the head stock when really well this time. The two pieces fit with no need for full.
October20th 2014
While waiting for the finish to cure, I made the bridge. This bridge is basically from the Gore\Gilet Contemporary Acoustic Guitar Design and Build Build book. The shape is right from the Medium size Acoustic plan shipped with the book. The bridge is reinforced with carbon fiber fabric and I use it in combination with a 1 mm thick hardwood CF reinforced bridge patch. This gives me a very light bridge but one with good lateral stiffness from the two separated parallel carbon fiber sheets.
The first task is to rip a 12 mm Walnut bridge blank so that you end up with an 8 mm thick slice and a 3 mm slice. I clean up the gluing faces on each side with a plane and use epoxy to laminate them with a sheet of carbon fiber fabric in between. I let the epoxy cure over night.
I clean up the top edge with a plane, tape on a template and first cut very close to the template with a band saw. I clean up the profile of a belt sander. I use to route to the template, but I have been getting spooked shaping with the router. Also it just takes a moment to cut out the shape and clean it on the band saw. I also drill the bridge pin holes before removing the template.
With some drawn out guide lines I use my Luthier's Friend as a drum sander to thin the wings. I just keep my eye on the guide lines in the early cuts. Once the cut is deep enough it is easy to feel how far to go. Although my final target for the wings are 2 mm. I only take them down to about 4 mm or so at this stage. Ultimately I will end up with a 9-10 mm high with 2 mm or so thick wings.
I put a 16: radius on the top of my bridges. I use a wood radius block to sand the radius on to the top. I take a bunch of care not to over sand the sides and expose the CF on the top of the bridge.
At this point the bridge is roughed out. I use stewmac bevel cutter to bevel the pin holes and then finished sanded the bridge. I ended up a bit tall and took 1.5 mm off of the bottom of this bridge and then radiused the bridge to match the 32 foot radius of the top.
Then the magic ebonizing solution. (1 quart apple cider vinegar, one 0000 steel wool pad, washed of any oil, and well rinsed to remove soap). After sitting in the vinegar for about a week it is good to go. The blackening is not a stain rather it is a chemical reaction between the tannin in the wood and the iron oxide in the solution. The wood is changed deep enough to allow for some finish sanding. Also no problem just putting on more.
October23th 2014
I am taking a liking to the ebonized Walnut bridges.
I just pulled this guitar out of the spray booth this afternoon . I am going to wait until the morning until I start wet sanding and buffing out the finish. I think I am getting better with the spray gun as these pictures are the guitar 15 or so coats of EM6000 lacquer with no level sanding. Not a sag, orange peel, over spray or drip to be found.
October27th 2014
While I impatiently wait for the bridge glue to cure I have some time to post a few more photos.
I fretted the neck, sanded and polished the guitar, installed the tuners and am current gluing on the bridge. All of this is pretty straight forward. I think the only thing that I do different than most is to not tape off the bridge. Taping the bridge with an undersized piece of tape would save me a bit of time, but I find it very easy to scrape the finish out of the middle of the bridge area. Working to get a clean edge is the same in either case. I position the bridge, screw it down tight and trace the bridge using a brand new scalpel blade. Once i clear the bulk of the finish out of the bridge area I use a sharp chisel to remove the finish right to my traced cut line. Some of it is in my pictures.
Oh by the, I am using the new LMI instrument glue for the bridge. My old procedure when using a vacuum clamp was to wait 10 minutes remove the clamp, clean up the squeeze out (it use to be soft but held together and easy to remove.) With the new glue the squeeze out was hard after 10 minutes, I used a bit of water to soften it and remove the squeeze out. It is a drag to be cleaning cured glue off the finish. I think I will clean up after 5 or so minutes now.
October 31th 2014
Well I strung the guitar up this week.
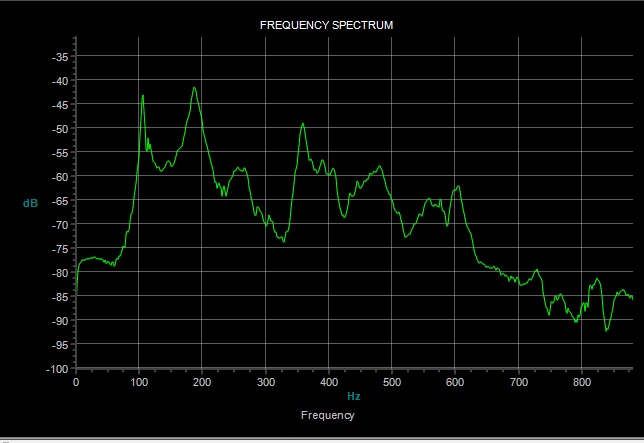
Here is the tap spectrum with the strings on. The Air is at 102, the top is at 184 and the back is 152. I have mounts for side weights so I will add some weight looking to move the top closer to 180. The back is not very active, but I have the bottom brace tall so I can start shaving it to move the back down a bit. It might resonate a bit more then as well. It was a dense plate of cocobolo so I did not think I would get a very active back. All and all the guitar is starting to sound pretty good. Not as nice as my build of a Gore Medium size steel string, but with the smaller body and 14 fret to the body I was expecting some compromise sound wise. I have had it sitting with a tone-rite running. It has a rough setup now. I will get it properly setup up this weekend.

.jpg)
.jpg)
.jpg)
.jpg)
.jpg)
.jpg)
.jpg)
.jpg)
.jpg)
.jpg)
.jpg)
.jpg)
.jpg)
.jpg)
.jpg)
.jpg)
.jpg)
.jpg)
.jpg)
.jpg)
.jpg)
.jpg)
.jpg)
.jpg)
.jpg)
.jpg)
.jpg)
.jpg)
.jpg)
.jpg)
.jpg)
.jpg)
.jpg)
.jpg)
.jpg)
.jpg)
.jpg)
.jpg)
.jpg)
.jpg)
.jpg)
.jpg)
.jpg)
.jpg)