I am not totally sure I know what a Flamenco Negra is. I luckily got my hands on a couple and was disabused of the notion that the Flamenco players were just jealous of the Classical guitar players, and the they were more like classical guitars. The best one I heard while having rosewood back and sides was very light relative to a classical. The top resonance was down a bit from a classical and the back resonance was much closer to the top's resonance. With that in mind I will voice the top like I have been voicing my blancas but have a very thin Honduran Rosewood back. Right around 2 mm. The negras often have slot head tuners so I will make a spanish cedar slot head neck.
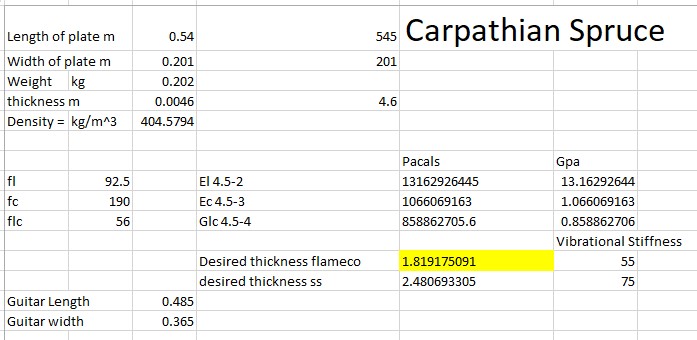
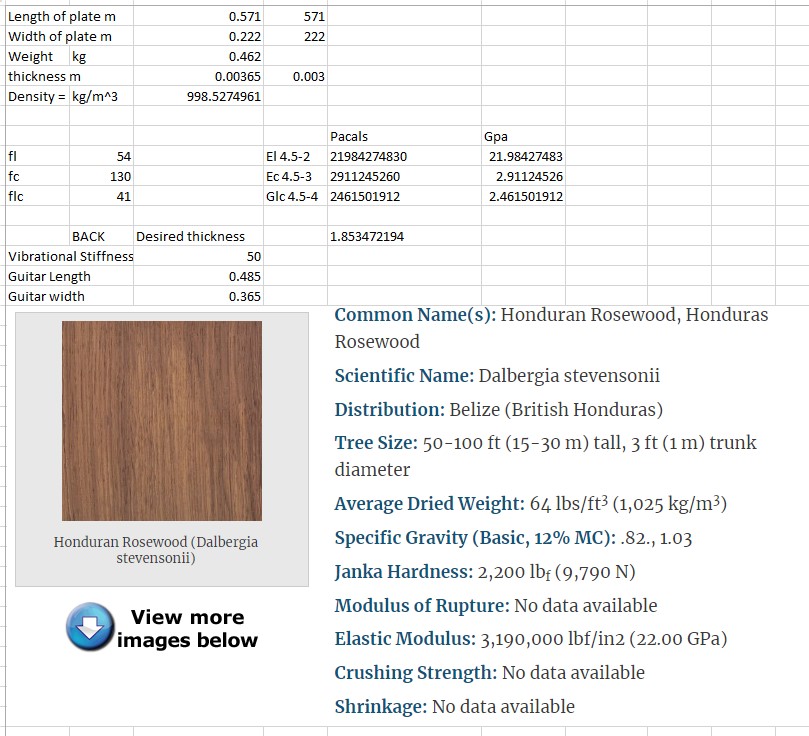
I just started today. I was really happy with the Carpathian Spruce I bought a few years back from the stash of a seattle classical builder. It has Adi like stiffness with Engelmann density. It tap would ring loud for a full 5 seconds. I almost put it away to save for a classical but in the end I decided to use it. The Honduran Rosewood has a glass like tap. It is rather dense compared to Brazilian or East Indian but it is quit a bit stiffer. I might go a bit below 2 mm thickness. It is amazing that my plate tested to almost exactly to the values in the wood database.
After tap testing the plates I jointed both of the plates
While the plates were curing I worked on the neck as well. I used a 15° angle for the scarf joint. I do this so often I finally built a jig that makes this quick and clean.
I use a plane to clean the gluing face.
No fancy glue up jig, I just do it on the bench
I used a plane to clean up the face of the headstock I draw a line to help stay even when I plane.
I draw out the rough head stock and the neck thickness including the taper of the neck. I make sure that the profile allows me to put the scarf joint glue line just under the head stock angle break. I mostly plane the headstock face and the fretboard side of the neck. Planing the headstock or the fretboard face moves the break angle up and down the neck. I prioritize getting the scarf glue joint positioned. If necessary I will thin the neck and headstock a bit from the back side. In this case it all worked out.
I draw a line where I want the break angle, also in this case it leaves the head stock at the thickness I want now. I also draw the thickness line all around the head stock so I can watch it while I plane.
I finished by starting the stack for the heel.
April 20th 2021
Another day working on the neck. I did get it to the point that I can move forward with the rest of the build. With a Spanish heel the neck has to be roughed out early as it is part of the rims. The more done at this time the better. I will rough out the classical heel tomorrow.
The night before I glued the heel stack to the neck so I was ready to go with the neck blank in the morning.
I used my handy heel slot jig to cut out the slots on my table saw. I have it down where a put a brad right above the 12 fret and in the center of the neck as a index for the jig. The fence is square so to use the jig I set the blade height set at a 3° angle. I cut with the fretboard face on one side of the fence and then the other.
With the slots cut I drew out the heel slipper and the heel profile and cut it out on the bandsaw. I cleaned up bottom of
Note the alternating grain direction of the heel stack (the mark of a true craftsman (or so I'm told)
I marked out and used a combination of my fancy plane and/or a chisel and banged out the slipper profile. Note the backer board on the fret board face on the cut line to stop chip out.
I laid out the the fretboard taper and the head stock shape and roughed out the neck.
I really should of had put on the head stock veneer but not too late.
I put a 15° angle on a BRW headstock blank. Clamped a parallel right on the veneer/nut line and used it as a reference for the veneer.
I glued on the veneer and finalized the thickness (20 mm) of the head stock with my safeT plane.

.jpg)
.jpg)
.jpg)
.jpg)
.jpg)
.jpg)
.jpg)
.jpg)
.jpg)
.jpg)
.jpg)
.jpg)
.jpg)
.jpg)
.jpg)
.jpg)
.jpg)
.jpg)
.jpg)
.jpg)
.jpg)
.jpg)
.jpg)
.jpg)
.jpg)
.jpg)
.jpg)
.jpg)
.jpg)
.jpg)
.jpg)
.jpg)
.jpg)
.jpg)
.jpg)
.jpg)
.jpg)
.jpg)
.jpg)
.jpg)
.jpg)
.jpg)
.jpg)
.jpg)
.jpg)