Koa\Bearclaw Sitka Spruce 00 Steel String Guitar blog:
May 17 2020
The body still needs to be bound but I decided to finish the neck before the bindings. Curious about how well I got the neck angle, I doubled taped the bridge on and checked.
Just like downtown!
.jpg)
A pretty clean fit as well.
.jpg)
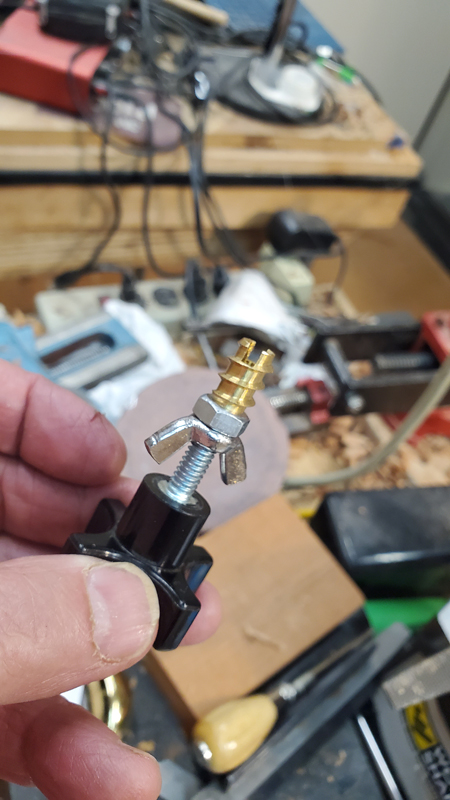
For the bolt on neck I only use a STI-225 Brass self tapping insert. I have had to find these a few times. the last time was on amazon. [url]https://www.amazon.com/4-20-Tapping-Thread-Inserts-Brass/dp/B002GPHRSA[/url]. These bolts are great for end grain applications. The slot on the bottom are the knives for cutting the threads not a screw drive slot. It is confusing as there are other threaded inserts that have a screw driver slot. Here is how I set them up to be installed.
I marked out my insert holes.
.jpg)
I uses a 5/16 inch drill bit to drill. I used this fancy hole drilling jig I picked up at a hardware store to drill straight holes on the tenon. I think this is the first time I remembered to use it and it worked out great. In the past I used my drill press by rotating the table on edge. The tool also worked as a clamp proving some support to the tenon as well.
.jpg)
I have a set of hole centers that work great for transfering the hole pattern to the heel block in the mortise.
.jpg)
.jpg)
.jpg)
I installed the insert and sealed the threads with thin CA. Careful as it is a pain if CA gets in the threads.
.jpg)
.jpg)
I use the same insert 5/16th bit to drill the holes in the mortise. The 5/16 gives a bit of slop to make it easy to find the insert.
I any case the neck bolted on with out issue. When I really bolt the neck down I will use belleville washers to help lock the bolts in.
.jpg)
I also drilled for the truss rod and notched the body to allow installation of the neck with the truss rod. I also made sure that I had access to the truss rod.
.jpg)
.jpg)
.jpg)
.jpg)
.jpg)
Lastly right before this lunch break I cut a close profile on the neck and used my safe-t plane to thickness the headstock.
.jpg)
.jpg)
Not shown I also use the Safe-T plane to taper the neck. I put a shim at the nut location that matched the amount a taper I want. For example if my taper was 16 mm to 19. I will use a 3 mm shim. With this work the neck is pretty well roughed out. On to tapering the fretboard
.jpg)
May 17 2020
I finished today tapering the fretboard. Not much new. I did move away from calipers for laying out the neck as I always ended up a .25-.5 mm off using 2 separate measurements. Today I use a handy ruler I got from stewmac that has a centering layout on one edge. I do not end up with accumulative errors that I need to fixup.
.jpg)
I ripped close to the layout lines on the bandsaw. cleaned to the line with a bench plane.
.jpg)
.jpg)
I used a couple of 1/16 drill bits to index the fretboard on the neck
.jpg)
The final step was to trim the fret board. I used a 3" radius
.jpg)
.jpg)
.jpg)
May 19 2020
Before gluing on the fretboard to the neck I did another pass at all of the neck angles as it is a pain to change with the fretboard glued on. The neck angle was great but the neck was tilted just a bit toward the bass side. With a squared off heel it is really easy to change with a plane on the heel cheeks. This went OK but one caution and a tip. When planing the heel cheeks it is easy to blow out the back of the cut. So always plane away from the fretboard face. I still had extra wood on the heel cap side but it still helps to relieve the edge of the cut about the amount you will remove. I took a few strokes off the heel cheek but the angle did not change. If this happens do not take more off; rather find what is holding the neck to keep it from moving. Tip. I fit a thin sheet of 400 grit sand paper under the cheeks all the way to the tenon and with the neck pushed down pull it out from the side. Do it a couple of times. Pull the neck and check where the sandpaper is hitting. WIth a chisel I remove any wood not on the heel cheeks that is being touched by sand paper. I repeat this until only the heal cheeks are being marked and being marked all the way across. On the cheeks I only remove the lightest of shaving from the area marked by the sand paper. Off of the heel cheeks I am more aggressive.
I used a centering tool when I checked for center and when I was happy I rechecked the neck angle. It should not have and it did not change.
.jpg)
.jpg)
I remember to install the truss rod and using the index pins I drilled and a long caul. Glued on the fretboard.
.jpg)
.jpg)
When I started to prepare the neck for carving, I realized I had an issue with the scarf joint location. This neck layup was originally made for a classical. I could not thin the headstock and keep the scarf joint right under the nut like I wanted. If the scarf joint was properly located I could have worked in a volute that blended properly with the neck shaft's ebony strip. This was not entirely a surprise so I installed a Koa back strip. I used the Safe-T plane to remove 2 more mm from the back of the head stock and hand blended a transition to the neck.
.jpg)
I made the tight bend on a hot bending iron. The koa bend without issue.
.jpg)
With some carefully placed clamped the curve closed really well.
.jpg)
After I let the wood dry still clamped I used some structural epoxy and glued the backstrip on.
.jpg)
I trimed all of the excess koa off and moved on with the hope that the koa backtrip would shape correctly as I naturally carve the neck.
I alway layout the first set of facets on paper and the neck. WIth this simple cathedral shape once the primary facets are carved I can see the addition facets without penciling them in.
.jpg)
I hog most of the wood off with a spokeshave and finish the facets with a rasp. on the nut and heel side.
.jpg)
.jpg)
.jpg)
I literally just go back and knock off the corners of the facets with both the spokeshave and the rasp. I then go back and knock off the new corners with the rasp or a scraper.
Here it is getting close. After this point I cleaned up headstock transition and blended it all into the neck. I use a combination of chisels and scrapers for this work.
.jpg)
I drew a rough outline of the heel and planed and rasped a rough shape. It is pretty close. I will finalize the heel once a I decide on a heel cap.
.jpg)
First I planed in the angle I wanted
.jpg)
Then I started shaping the corners. While shaping the corners I am cutting all the way until I am blending the curve into the neck. I use very long strokes with the rasp thus assuring that I end up with smooth lines.
.jpg)
With the headstock shaped I marked holes for the tuning machines and the logo
.jpg)
Finally I will move on to binding the box. I have been hating the idea of bending for the cutaway.
.jpg)
.jpg)
May 22 2020
I got the bindings and the pruflings installed. Nothing fancy, Ebano Rocklight bindings. Two BWB purfings together the W is maple. I bent the normal side in my fox style side bender, and I bent the cutaway side by hand on a bending iron while the waiting on the binding in the fox style side bender. I found out that Rocklite bends like butter completely dry with the bending iron at 11 (Nigel stopped by and added the extra temperature setting. ) I also found out while touching up the bindings from the fox bender that Rocklite can take a set. That is I could not bend it on the bending iron, or at least when I did it sprung back to the set shape. This was not an issue I just pulled the binding in with tape on the guitar. I was just surprised. I had just finished bending the cutaway curves, but I could not tighten the lower bout curve on the normal side after they cooked in the fox bender.
.jpg)
.jpg)
.jpg)
I have learned before binding to level the sides. They really need to be sanded to very close to final. One does not want to level the sides when the bindings are installed. I use this fancy drum sander that I bought from Grizzly. I first pencil all over the sides to make sure I hit low spots also to make sure I do not go too far. The drum sander can remove wood fast, So if I do not see pencil I am not sanding.
.jpg)
.jpg)
I use a Fleischmann binding jig with a 1" router bit and the LMI set of bearings. I happily went back to having the cutting index right on the router shaft after a couple of years trying a variety of binding jigs that used a 1/4" end mill and an adjustable index. The separate bearings are a pain, but once setup I can be sure that no mater where on the bearing I cut I get the same depth. On any of the other binding solution if the index and the bit are not properly aligned the depth of the cut varies. I am sure other who are really good at setting up their tools do just fine. I had a completely hassle free time routing all of the binding channels and the purfling channel in the top.
.jpg)
.jpg)
.jpg)
I fit the binding and use a chisel as a scraper if there are any places I need to clean up in the channels. I used a fancy purfling cutter to score the top of the cut away and chiseled out the waste.
.jpg)
Also before installing the binding I knock off the inside and the outside corners of the bindings. Knocking off the inside helps them seat easier in the channel, knocking off the outside helps to keep from braking the tape as it is pulled tight.
.jpg)
I hate it when one of the bindings at the joint is not completely seated causing a misalignment of the the purfling lines. So I generally clamp both ends at the same time
.jpg)
After a lot of glue and tape and leveling the purflings, it all looks good.
.jpg)
.jpg)
.jpg)
.jpg)
.jpg)
June 1 2020
Usually I am Ok with visual lines in wood as they reflect wood as a natural product. However as I was starting to clean up the neck I could not get past a visual flaw in the spanish cedar of my neck. It looks like a crack put it is not; a shaving from that area did not separate. Still I could not get over it so I made a new neck out of some really nice flamed mahogany that I had. I did not take pictures making the neck, for the most part I followed the same process. The neck blank was thicker than my previous neck blank so I had the flexibility to put the end of the scarf joint right at the nut (so ultimately under the valute. Given that the head stock veneer covers the other end of the scarf, it worked out perfect.
Old neck with flaw
.jpg)
.jpg)
New neck
.jpg)
.jpg)
June 15 2020
I am in the construction final steps for this guitar. I drilled out the tuner holes. I already had pilot holes from my template. I drilled the holes for the shaft on my drill press and reamed out the wider hole for the bushing with [url=https://www.stewmac.com/luthier-tools-and-supplies/types-of-tools/reamers/peghead-bushing-reamers.html]Peghead Bushing Reamer[/url] from stewmac. They sell five of these covering most of the tuning machines.
.jpg)
.jpg)
.jpg)
.jpg)
I finally had to tackle inlaying the requested initials in the fretboard. The details were not too fine to route they were very hard to mark as there were some tight spaces forcing me to a .3 mm lead pencil to mark. Being able to see where to route is everything when inlaying. You mind is also always trying to fool you when you can not see clearly. In any case it came out OK.
.jpg)
.jpg)
.jpg)
.jpg)
I also laid out some diamonds and cut the channel with a scalpel and a mortise chisel.
.jpg)
.jpg)
.jpg)
.jpg)
.jpg)
On to the logo, I have shown this before. I know every cut and turn. It still takes about an hour of cutting. My goal is a perfect fit after cutting out all the pieces. In the past I spent a lot of time filing the pieces to get them to fit. Two issues, not staying on the line and more importantly keeping the saw perfectly square so the cut is not tapered. I have to say this was my best fit.
.jpg)
.jpg)
.jpg)
I cut half one way, I then start at the other end. I do not want to make the turn at the beak.
.jpg)
.jpg)
.jpg)
.jpg)
.jpg)
Ready for sanding prep.
.jpg)
.jpg)
After a day of prep, I put a coat of shellac on. I will sand it off, but it really helps me to find areas that are not quite level. Also it lets me see the color.
.jpg)
.jpg)
Start
| 