Starting a new commission — a Koa back and sides with a Sitka Spruce top. This is only my second guitar this year. The Koa is a stunning set with wild curl, and I spent time testing the plates to determine target thickness for both top and back.
Plate testing to determine target thickness for both top and back — measuring density and stiffness properties as part of the Gore / Gilet methodology.
Gathered up templates and mold for the 00 cutaway shape.
Templates and mold — 00 cutaway shape
✦
May 25th, 2024 — Neck Blank
Got started on the neck blank. The new bandsaw paid for itself immediately — the scarf joint cut was so clean it barely needed touching up with a plane.
Laid out the neck headstock and taper. I start this work before adding the heel block — easier to run through tools with the neck in a simpler state. I get close on the bandsaw to avoid the mess, then finish with the Safe-T Planer. Added a 2.4mm shim near the nut end to create the correct taper under the Safe-T Planer.
✦
June 15th, 2024 — Mise en Place
Sorry for the posting delay — a web.com buyout of mydomain left me unable to access my pictures for a while. During that time I've been gathering and fabricating components before assembly. Not my normal process — in cooking terms, mise en place.
Heel and Neck BlockThe neck block is designed for a bolt-on / bolt-off neck and a cutaway. It's a two-part block — one part is an extension that will ultimately be routed out for the neck extension. In the past I struggled cutting out the combined block, so this time I profiled the extension separately on the bandsaw, glued on the heel block, and used the profiled extension as a guide to profile the heel block. Much cleaner result.
Two-part neck block for bolt-on / bolt-off cutaway — complete
✦
June 15th, 2024 — Top & Back Braces; Joining Plates
Ripped and thicknessed some brace stock, then used a 27.5° blade angle to give the back braces a gabled profile — two flat faces meeting at a ridge, which resists bending more efficiently than a rectangular profile.
For the falcate braces: ripped a batch of 2.2mm strips and thicknessed them to 1.7mm. I use three strips to make each falcate brace — bent on an iron and then epoxy-laminated together. The lamination process gives a brace that permanently holds its curve and is stronger than a single piece.
Also joined the top and back plates today — clean center joint on both.
✦
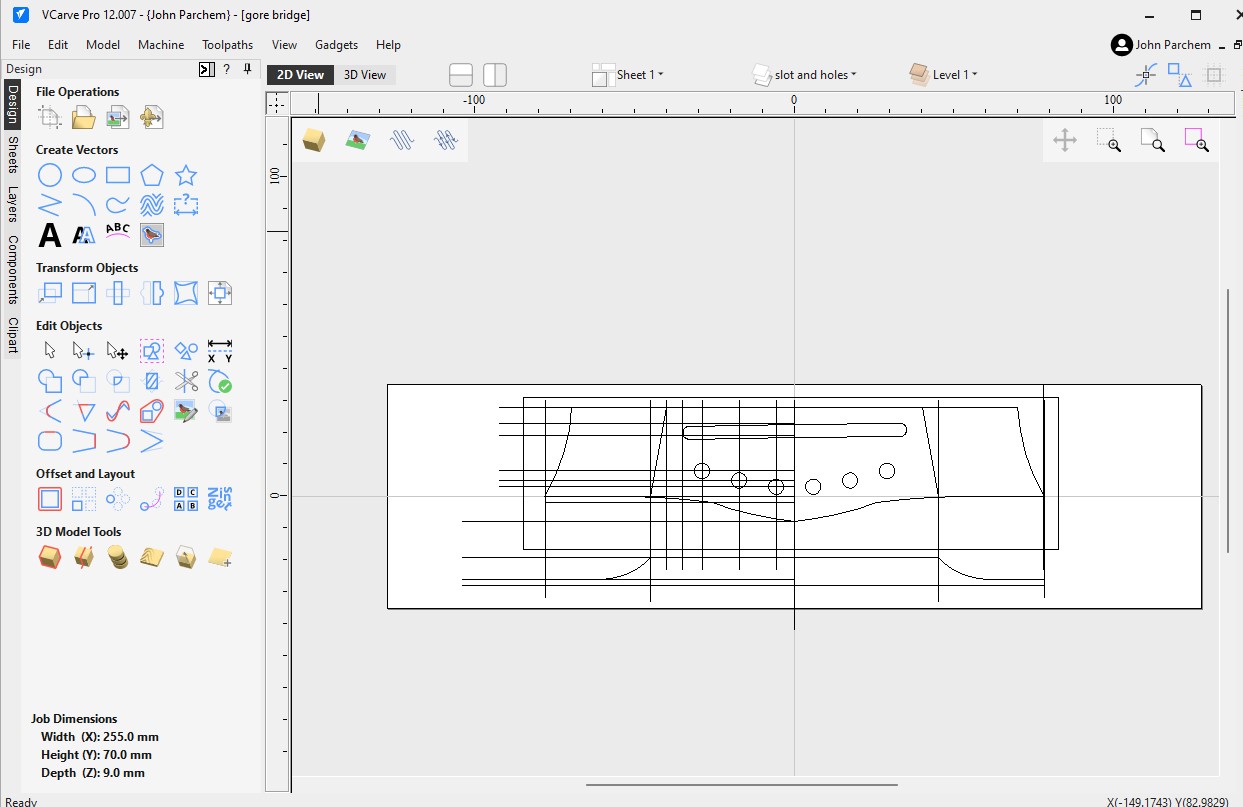
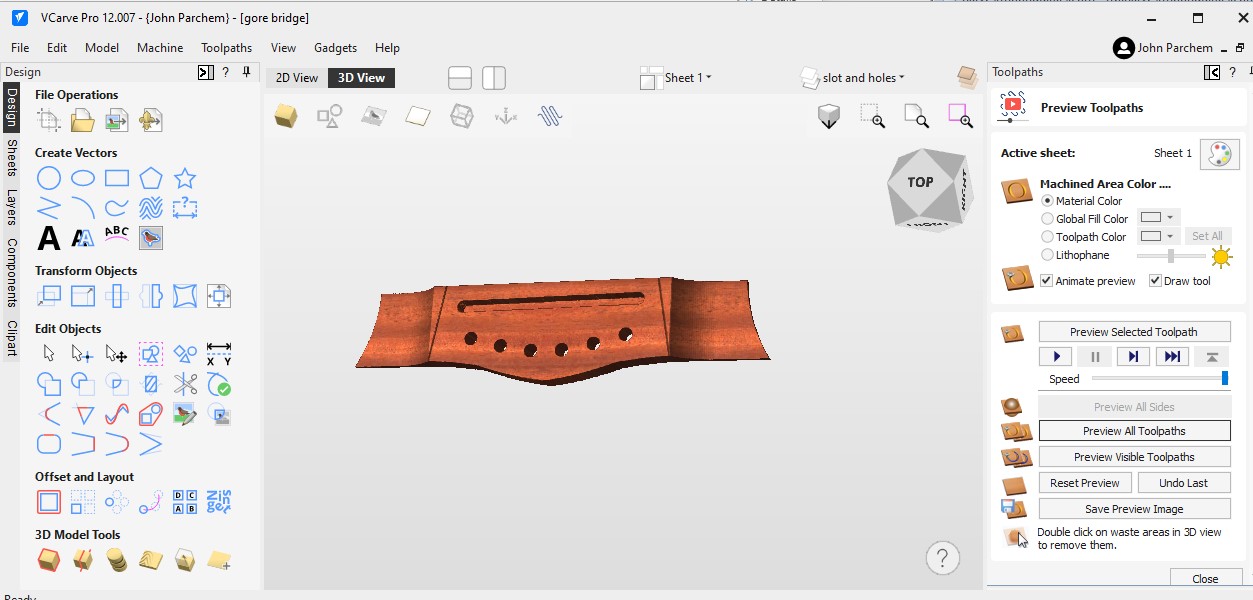
June 15th, 2024 — CNC First Use
Finally pulled the trigger on a CNC machine — a Genmitsu PROVerXL 4030 V2. I'd always feared the CAD side of it, so I started with the free trial of VCarve and drew out a Gore-style bridge and simulated the tool paths. It's 2.5D, which has limits for true 3D profiles like sloping the tie block, but I can etch guide lines and finish by hand. To test the process I cut a bridge in poplar as a practice run before committing to rosewood.
✦
June 28th, 2024 — Falcate Braces & CNC Rosette
Using epoxy I laminated the previously bent strips and split them to form the two pairs of falcate braces. Three laminated strips per brace, split down the middle after curing to give a matched pair with identical curves.
Primary and secondary falcate brace pairs — laminated, split, ready to install
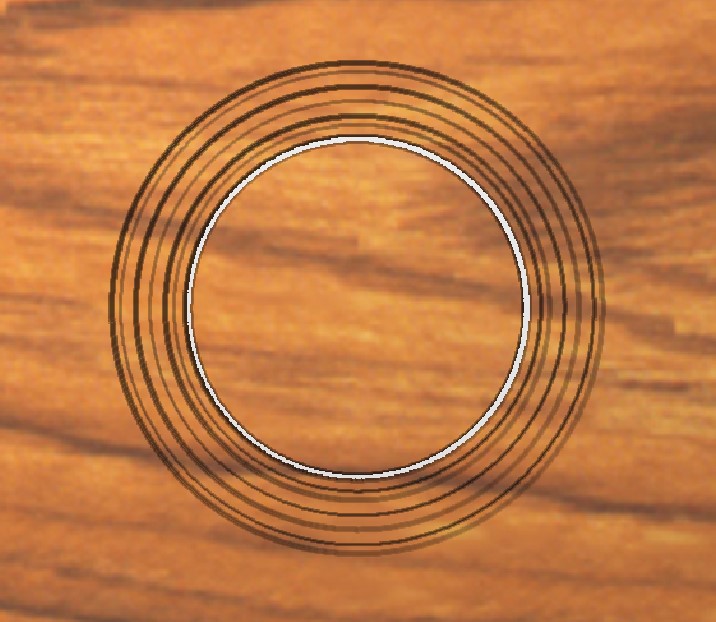
First real routing work on the CNC: I designed a three-ring rosette as a nod to a Martin 00. Still new to CAD, I ran a test pass on a scrap piece of Sitka first, then cut Koa offcuts for the center ring before running the toolpath on the real top.
With the test confirmed, ran the toolpath on the real top. Sealed the channels with shellac and alcohol, installed all three rings, then flooded with ultra-thin CA. Leveled and scraped back — the Koa ring sits beautifully.
Completed rosette — three rings with CNC-cut Koa center ring, a nod to the Martin 00
✦
July 6th, 2024 — Headstock CAD, Side Bending & Templates
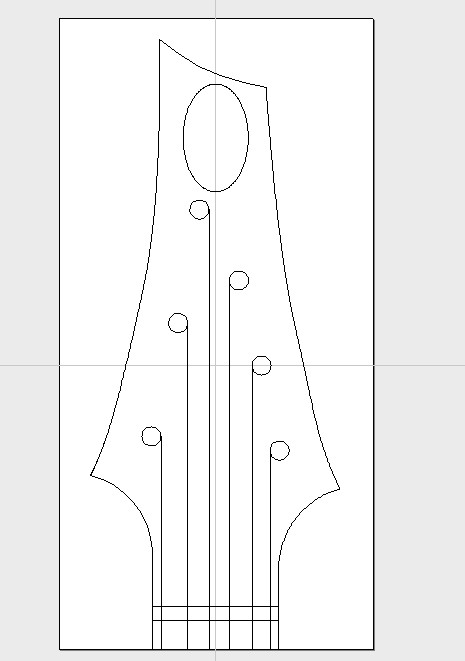
A lot of the recent work has been in the CAD software — not visible in the shop but productive. Worked out the straight-string contemporary headstock that incorporates the client-supplied inlay. I'll use the CNC to cut it out when the time comes.
Used the Fox Bender to bend a set of profiled sides. Sides thicknessed to .080" and bent at 285°F. The cutaway side got a soak of Supersoft II and sat wrapped for about 8 hours before bending — no issues.
Also using the CNC to make templates for the build. The bridge pin hole template has its leading edge at the saddle location — on a falcate-braced guitar the bridge pin holes must be drilled before bracing (the primary falcates need to run between bridge pins), so accurate placement relative to the saddle is critical.
Revised Gore bridge CAD — figured out how to profile the wings with the trapezoid block shape
✦
July 10th, 2024 — Rim Assembly & Neck Angle
With the sides bent, used Titebond to glue on the tail and neck blocks. I've always struggled clamping the heel block to cutaway sides — this time it finally occurred to me there's no need to glue both sides at once. Glued the cutaway side first, let it cure for a couple of hours, then glued the non-cutaway side. Much less stress.
Profiling the rims: used a plane to remove most of the excess on the back side, then a 10' radius board to sand to profile. For the top, I work primarily on the lower bout to create the correct neck angle — rather than the more common approach of working the upper bout. The idea is to drop the lower bout, leaving the upper bout square to the neck angle.
Neck Angle MethodI do most of the top profile sanding on the lower bout. Most builders profile the entire top and work the upper bout to create neck angle. I instead get most of the angle by dropping the lower bout, leaving the upper bout square. The neck joint stays clean; it just looks different on the bench than it does on the finished guitar — which ends up completely normal.
3mm drill bit check shows the neck angle is close — finish adjusting after bracing
On a falcate-braced guitar the primary falcate braces must run between bridge pins, so the pin holes need to go in before bracing. The CNC bridge pin hole guide has its leading edge at the high-E saddle location, making it easy to locate, center, and square. The drilled holes then index the CNC-cut bridge plate — 1.5mm hard maple with a CF weave laminated between it and the top.
Falcate Bracing SequenceGore's process puts the CF tow for the primary falcates down at the same time as the bridge plate. I've found that's too stressful to manage simultaneously. Instead I install the plate alone first. When epoxying the falcate braces I run the CF tow over the plate under the brace — same structural result, much more manageable process.
While the bridge plate epoxy cured, laminated a bridge blank from: 3mm Brazilian Rosewood / CF weave / 8mm Brazilian Rosewood. Not wasting good epoxy. Also carved a test bridge from a spare rosewood blank while waiting — that one's earmarked for a non-falcate guitar.
Happy with the test bridge shape, carved the laminated Brazilian Rosewood blank with CF weave running through it.
Cut the rebates for the bridge plate in the primary falcate braces — razor saw to depth, chisel to clear. Then epoxied the falcate braces on. No in-process photos as usual — epoxy on fingers. Mise en place pays off here.
Mise en place before epoxying — everything staged, no mid-process scrambling
Falcate braces epoxied down — primary braces running between bridge pins as required
✦
July 18th, 2024 — Brace Profiling, Linings & CF Tape
Once the epoxy cured, profiled the primary and secondary falcate braces. Planning to leave brace height around the bridge at 7mm — my expectation is the top resonance will end up around 180Hz. The 00 ends up with a higher top resonance than a Gore medium steel string at the same brace heights, being a smaller guitar. Then epoxied down all braces except the upper transverse. Noticed the sound hole top doubler patch was missing from the last post — realized I'd forgotten to install it before the falcate braces. No problem: cut one out and installed it after.
While the epoxy cured, spritzed a set of reverse kerfed linings with water and clamped them to the outside of the sides to pre-bend them. They take the shape beautifully once dry — far less breakage risk when installing.
Finished the day laying carbon fiber tape on top of all the braces — one strip above and one strip below each brace.
✦
July 23rd, 2024 — Carbon Fiber: The Value
Why Carbon Fiber on the Braces?The main value of the CF strip is preventing cold creep over time — wood under sustained string tension will slowly deform; CF resists this almost entirely. A secondary benefit: by having 15–20% of brace stiffness contributed by CF, I get better consistency from guitar to guitar. Two strips per brace, one above and one below. Once the upper strip is on, the top nearly perfectly holds its radius on its own.
The downside: once CF is epoxied on there's no way to tune the braces by removing wood. That's where the consistency helps — all braces are sized to spec from the beginning rather than tuned by feel.
✦
July 24th, 2024 — Upper Transverse Brace & Back Braces
The upper transverse brace has a complex radius — 28' on the edges with a flat section in the middle where the fretboard sits. Instead of making it by hand I spent a few hours on the CNC, which also let me make an exact reverse caul for clamping. Still cut the rebates for the falcate braces and sound hole braces by hand: razor saw to depth, chisel to clear.
Upper transverse brace clamped using CNC-made reverse caul — perfect contact across the complex radius
With top bracing finished, spent considerable time dialing in the neck angle. The top had slightly too much angle from the initial profiling — used a plane on the waist and fretboard extension, working a bit at a time until the extension landed right on the bridge location.
Cut and radiused all back braces from the gabled stock made earlier. Rather than fighting the gobar deck with the 10' radius and gabled braces, glued them one at a time using the radiused board and cam clamps.
Just a little more work and the box can close
✦
September 28th, 2024 — Fretboard, Bridge & Closing the Box
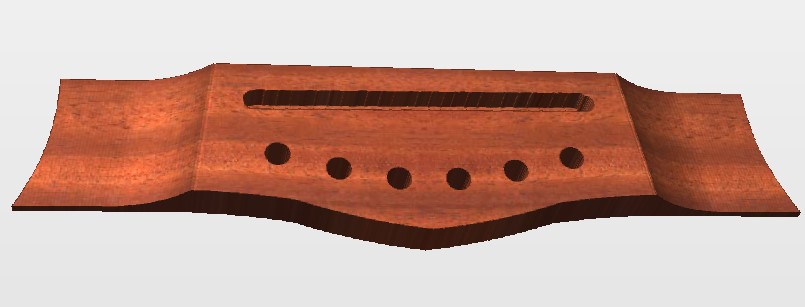
Before closing the box, built out a few more components. Cut and planed a fretboard and bound it with ebony bindings — a faux-bound fretboard look. Found a nice block of Brazilian Rosewood, laid it up with a sheet of carbon fiber, and carved two bridges on the CNC. The second design (on the bottom) is the keeper.
Two CNC-carved Brazilian Rosewood / CF bridges — the lower one is the keeper
Also used the CNC to cut out the neck extension wedge pocket, then cleared the waste with a chisel.
Everything ready — time to close the box
✦
September 30th, 2024 — Bindings
Binding is my least favorite part of the process — especially with a Venetian cutaway. Used the side bender to bend the bindings; the cutaway form worked well and the binding came out of the form without the usual spring-steel drama.
Using two black-white-black purflings matching the outer rings of the rosette. These bend cold but I had the idea to pre-glue them up on the bending form so they'd hold their shape as a laminate before gluing to the guitar. Mostly worked out.
Started on the cutaway side first and cut the rebate for the cutaway-to-neck join. The binding went in, then discovered one section of purfling on the cutaway hadn't seated fully. When planing back, part of it cut out. No major issue: heat gun to pull the purfling, clean the channel, tapped in new BWB strips. Came out good.
✦
November 3rd, 2024 — New Neck: Scarf, Stacked Heel & Tenon
The first neck blank had a few layout mistakes I'd been working around, plus some shortcuts that didn't pan out. Started fresh with a new blank, this time using jigs refined by past experience plus some new ones made on the CNC. The plan: cut the scarf joint, use the excess to build a stacked heel from the same blank. With the bridge already located, care is needed to place the 12th fret in exactly the correct position.
Second Neck BlankThe first neck had accumulated too many compromises. Starting over is sometimes the right call — better a clean blank than a guitar that plays slightly off because of a neck that was forced to work.
Used the scarf joint jig on the bandsaw as before, then cleaned the cut face with a plane. Tapered the neck from the fretboard side: drew the profile on the side face, keeping the bottom of the headstock scarf joint right at the nut location. Planed both the neck and headstock to set the angle break at the correct location, then used the Safe-T Planer to finish the headstock to thickness.
Safe-T Planer brings headstock to correct thickness — back stays in plane with face
Laid out the stacked heel and glued it to the neck. Having tapered from the fretboard side, the back of the neck was still square — no taper angle to deal with. My backwards neck angle method (angle in the lower bout, upper bout square to the neck) means the neck blank meets the body squarely. Looks unusual on the bench; looks completely normal on the finished guitar.
Cut the tenon at the table saw using the Spanish heel sled and tenon jig — blade set to 3° (note to self: 5° on the next build). A drill bit at the 12th fret location on both sides ensures the tenon cuts are perfectly even side to side. Drilled the holes for brass inserts using the drill press for square holes this time — on the first blank I'd eyeballed them with a hand drill. The difference is immediately visible.
✦
November 3rd, 2024 — Neck Pocket & Extension Fit
This is a bolt-on / bolt-off neck using the Gore / Gilet system — a pocket routed into the neck heel, with a heel block extension in the guitar body. The extension is glued only to the neck part of the pocket. Before routing, I can't describe how many times I checked the neck angle and 12th fret location relative to the bridge. With a fretboard correctly placed I also ran strings along the neck to verify the E string paths to the bridge.
String paths confirmed with strings — E string paths track correctly to bridge pins
First made a test plug in plywood on the CNC, then routed the pocket about .6" deep. Test plug was slightly big — went back to CAD, took thirty seconds off the plug dimensions, and cut the mahogany production plug. Much better fit; left it slightly proud and planed it flush to the neck.
With the wings still off the headstock, ran the neck back to the router table (still set up from the pocket work) and routed the truss rod slot through the neck extension.
✦
November 3rd, 2024 — Heel Profile & Wings
Added brass inserts to the neck extension and drilled the bolt holes through the heel block. Then, while the neck back was still square before adding wings, used the table saw to rough out the heel profile — easier to work while the reference face is square. Trimmed the heel to length.
Heel complete before headstock wings are added — square reference faces still available
✦
November 11th, 2024 — Headstock, Fretboard & Tuners
A few days of bit-by-bit work. Added small wings to the headstock, then used the CNC headstock template to shape it — mostly bandsawed, finished with a pattern bit at the router table. Checked the fretboard position relative to scale length four times before gluing on. Drilled the 10mm holes for the Gotoh tuning machines, then took the headstock down from 15.5mm to about 14.5mm with the Safe-T Planer to keep both faces in plane.
✦
November 20th, 2024 — Neck Carving
Carved the neck using a facet line method — drew the desired shape at the 1st and 9th fret positions, worked out a primary facet line, transferred it to the neck, then used a spokeshave, rasp, and knife to establish the facets. Once the facet corners are set, removing them reveals the final profile. Will refine a bit further after the body and neck are together.
Starting to look like a guitar.
✦
January 14th, 2025 — Third Neck: Fresh Start
Third NeckAfter a couple of months I'm back to where I was in November. Had a chip-out while routing the last neck that I thought I could invisibly repair during finishing. Well, that was not going to happen — so when I came to my senses I made a new neck. With the new neck I'm back to where I was, without the flaw. It all went a lot better this time.
✦
March 4th, 2025 — Inlays & Pore Filling
After Christmas and six weeks travel in New Zealand, finally back to finishing this guitar. Installed fret markers matching the pearl in the client's headstock logo, then glued in the logo inlay.
Guitar sanded and ready for pore filling. Koa could get away without pore filling — the grain is not as open as rosewood — but I fill it anyway: the fill helps confirm surfaces are truly level when sanding back, and there's something satisfying about watching the Koa pop when it floods with epoxy.
Pore Fill: System Three SilvertipUsing System Three Silvertip with fast hardener — a crystal-clear finishing epoxy. Minimum three coats, sanding back between each. Work continues until there are no shiny low spots. Better to chase complete leveling now than after spraying the topcoats. The Koa grain is stunning when wet.
✦
March 16th, 2025 — Post-Cat Royal-Lac Sprayed
Sprayed on the Post-Cat Royal-Lac topcoat. A two-part post-catalyzed finish — once cured it's hard like a poly and can't be burned in for repairs, but the clarity and depth are excellent. Five day cure time before level sanding and buffing. Here it is just off the gun.
Post-Cat Royal-LacRoyal-Lac with hardeners cures like a poly finish — very hard and durable. The downside is no burn-in repair once fully cured. When repair is needed, Gluboost Fill and Finish sticks to Royal-Lac just like a poly repair. The regular Royal-Lac has a longer cure time; the two-part post-cat version cuts that to five days.
✦
March 17th–20th, 2025 — Fretting & CNC Compensated Nut
While waiting for the finish to fully cure, finished up the assembly components. Discovered that a straight-flute reamer is the right tool for cleaning finish out of tuner peg holes — found a 4/6/8/10mm set for $16. Saves destroying the holes trying to drill out cured finish. Checked neck angle one final time, then fretted the neck.
Used the CNC to machine a compensated nut — designed in VCarve, milling individual intonation positions for each string along with string spacing guides. The blank was thickness-sanded first; milled the CNC features, then deepened the string slots by hand with a razor saw (the 1/64" bit didn't have the cutting depth needed).
Nut Compensation — Gore / Gilet MethodThis is the same idea as Buzz Feiten but based on Trevor Gore's work in Contemporary Acoustic Guitar. I take 2.5mm off the nut end of the fretboard, which gives up to 2.5mm of nut intonation adjustment. This significantly improves open chord tuning. If not doing a full intonated nut, even taking 0.8mm off the nut side of the fretboard relative to the zero fret position helps noticeably — it's essentially free on a nylon guitar and all you need for a ukulele. When I started intonating the nut I moved the saddle 1mm closer to the nut to ensure the high-E saddle intonation position doesn't fall off the saddle. Greg Holmberg put most of Trevor's work into a comprehensive spreadsheet including nut intonation — posted on the forum.
✦
March 27th, 2025 — Finished & Strung Up
Level sanded and buffed out the finish. Happy with everything except the headstock veneer — the client inlay on one side sat a tad low and wasn't properly leveled before spraying. Sanded off the headstock finish, leveled the veneer properly, and applied Gluboost Lac R' Shot lacquer directly to the headstock. Much better.
Put it together and strung it up. Still have a proper setup to do and want to tune the back resonance — but at this point everything looks good and it plays.
Technical Note — Greg Holmberg: Sound Radiation CoefficientAfter seeing the plate testing data shared during this build, Greg Holmberg calculated the sound radiation coefficient for this top: R = √(E/ρ³) = 13.9 — an exceptional result. The species average for Sitka Spruce is 11.0. At 13.9, this panel is well above average and, in Greg's assessment, the guitar has the potential to push the limits of what's possible on a steel-string flat-top. The top came from Pacific Rim Tonewoods, who worked with Trevor Gore to develop sonic grading — measuring density, long-grain modulus (E), and Q factor. At the Guild of American Luthiers they had a stack of sets available for selection; I picked sets that were noticeably stiff for their density. I plan to check monopole mobility before shipping.
Pacific Rim Tonewoods' sonic grading page explains the methodology developed in collaboration with Trevor Gore.
Nut Intonation DiscussionHerman noted the similarity to Buzz Feiten tuning — the principle is the same (adjusting the effective vibrating length at the nut end) but this implementation is based on Trevor Gore's analysis. The 2.5mm fretboard shortening gives up to 2.5mm of nut compensation range. For most guitars even the simpler 0.7–0.8mm shortening makes a meaningful improvement. Herman noted he uses 0.7mm as standard and has a board with 1.2mm removed ready for a fully intonated nut. Trevor Gore is highly sensitive to intonation error; most players are comfortable at a few cents. How firmly you fret matters as much as the theoretical compensation.
✦
April 13th, 2025 — Back Resonance Tuning
A more technical video showing the process of tuning the active back and its effect on the top resonance post-build. Not casual viewing — this is the acoustic physics of box resonance adjustment in practice.
.jpg)
.jpg)
.jpg)
.jpg)


.jpg)
.jpg)
.jpg)
.jpg)
.jpg)
.jpg)
.jpg)
.jpg)
.jpg)
.jpg)
.jpg)
.jpg)
.jpg)
.jpg)
.jpg)
.jpg)
.jpg)
.jpg)
.jpg)
.jpg)
.jpg)
.jpg)
.jpg)
.jpg)
.jpg)
.jpg)
.jpg)
.jpg)
.jpg)
.jpg)
.jpg)
.jpg)
.jpg)
.jpg)
.jpg)
.jpg)
.jpg)
.jpg)
.jpg)
.jpg)
.jpg)
.jpg)
.jpg)
.jpg)
.jpg)
.jpg)
.jpg)
.jpg)
.jpg)
.jpg)
.jpg)
.jpg)
.jpg)
.jpg)
.jpg)
.jpg)
.jpg)
.jpg)
.jpg)
.jpg)
.jpg)
.jpg)
.jpg)
.jpg)
.jpg)
.jpg)
.jpg)
.jpg)
.jpg)
.jpg)
.jpg)
.jpg)
.jpg)
.jpg)
.jpg)
.jpg)
.jpg)
.jpg)
.jpg)
.jpg)
.jpg)
.jpg)
.jpg)
.jpg)
.jpg)
.jpg)
.jpg)
.jpg)
.jpg)
.jpg)
.jpg)
.jpg)
.jpg)
.jpg)
.jpg)
.jpg)
.jpg)
.jpg)
.jpg)
.jpg)
.jpg)
.jpg)
.jpg)
.jpg)
.jpg)
.jpg)
.jpg)
.jpg)
.jpg)
.jpg)
.jpg)
.jpg)
.jpg)
.jpg)
.jpg)
.jpg)
.jpg)
.jpg)
.jpg)
.jpg)
.jpg)
.jpg)
.jpg)
.jpg)
.jpg)
.jpg)
.jpg)
.jpg)
.jpg)
.jpg)
.jpg)
.jpg)
.jpg)
.jpg)
.jpg)
.jpg)
.jpg)
.jpg)
.jpg)
.jpg)
.jpg)
.jpg)
.jpg)
.jpg)
.jpg)
.jpg)
.jpg)
.jpg)
.jpg)
.jpg)
.jpg)
.jpg)
.jpg)
.jpg)
.jpg)
.jpg)
.jpg)
.jpg)
.jpg)
.jpg)
.jpg)
.jpg)
.jpg)
.jpg)
.jpg)
.jpg)
.jpg)
.jpg)
.jpg)
.jpg)
.jpg)
.jpg)
.jpg)
.jpg)
.jpg)
.jpg)
.jpg)
.jpg)
.jpg)
.jpg)
.jpg)
.jpg)
.jpg)
.jpg)
.jpg)
.jpg)
.jpg)
.jpg)
.jpg)
.jpg)
.jpg)
.jpg)
.jpg)
.jpg)
.jpg)
.jpg)
.jpg)
.jpg)
.jpg)
.jpg)
.jpg)
.jpg)
.jpg)
.jpg)
.jpg)
.jpg)
.jpg)
.jpg)
.jpg)
.jpg)
.jpg)
.jpg)
.jpg)
.jpg)
.jpg)
.jpg)
.jpg)
.jpg)
.jpg)
.jpg)
.jpg)
.jpg)
.jpg)
.jpg)
.jpg)
.jpg)
.jpg)
.jpg)
.jpg)
.jpg)
.jpg)
.jpg)
.jpg)
.jpg)