August 26th, 2016 — Traditional Meets Contemporary
I've made a few falcate-braced contemporary classical guitars at this point — cutaway bodies with a slightly radiused fretboard. They've been well received; my instructor commissioned one and switched to it from his mid-70s Kohno 30. But there are players who can't get past the contemporary features. So this build is the experiment: a guitar that looks like a traditional Hauser but carries the falcate bracing pattern underneath.
The wood: Lutz Spruce top and Brazilian Rosewood back and sides. Ebony bindings with maple purfling, and some kind of purfling pattern for the top that I'll figure out as I go. I'm taking a shortcut on this one — using an LMI classical neck and a classical rosette I already had on hand.
The IdeaFalcate bracing on a traditional classical platform. Everything about the exterior says Hauser — the proportions, the binding style, the clean classical headstock. Everything inside says Gore/Gilet — laminated curved braces, carbon fibre reinforcement, an active back tuned to specific resonances. The question is whether the bracing system translates to a nylon-string instrument with the same benefits it brings to a steel string.
First step: tap testing the Lutz top using one of the Gore/Gilet methods to determine target thickness. The Lutz fell into a normal range with a little more cross-grain stiffness than other tops I've measured — not unusual for Lutz.
Joined both plates. While digging through the plane drawer for a sharp blade, I found a new-looking Lie-Nielsen #62 low angle jack plane that I have absolutely no memory of buying. Being on the wrong side of 60 has its perks, apparently — surprise tools.
Loosely profiled the top, back and sides, thicknessed the back and sides, and glued on the back reinforcement strip. Ready to start bending and putting things together.
.jpg)
Plates profiled, thicknessed, and reinforcement strip applied — ready to start building
August 27th, 2016 — Solera, Rims & Rosette
As this is a traditional design I'm building on a modified solera that I made for my very first guitar. The modification comes from the Bogdanovich book — a removable outside mold on the solera. I combined my solera with an outside mold from Kenneth Michael Guitars. I also have a closed outside mold from my contemporary classical builds, which comes in handy for trimming the sides and gluing on the tail block.
No issues bending the sides and bindings on the Fox-style bender. I got a little ahead of myself and glued on the tail block before cutting both sides to fit — normally I'd wait so I could get the sides cut right on the centre line at the heel end. No real issue, but it meant doing all the measurements with a floppy glued assembly.
Took a couple of millimetres off the top side of the heel block so the top can sit flush to the neck — used a Bishop Cochran router base with the guide bar extended to balance the router on the plane of the neck. With the sides fit, I used a 15-foot radius sanding bar to trace out the heel slipper cut for the back, rough cut on the bandsaw, and assembled everything into the solera.
Spanish Neck Joint — SequenceI'm waiting to glue the sides to the neck until the neck is close to its final profile. It's a lot easier to deal with a neck than to deal with a neck with a guitar stuck to the end. The solera has a sloped ramp that gives 1.5–2mm of forward angle at the nut relative to the plane of the top.
Profile was much closer in depth at the neck end than the tail. When the neck side was close I used some adhesive sandpaper to prevent over-sanding. Also installed the rosette — used a router to cut the channel but decided to score the outline first with a knife circle cutter, then route out the waste to the knife line. Got my cleanest channel ever with a perfect fit. Glued in with Titebond hide glue.
Profiled the headstock while waiting for glue-ups. Glad I hadn't glued the sides to the rims yet — much easier cutting the profile on the bandsaw without them flopping around.
August 31st, 2016 — Sound Hole, Linings & Fretboard
It's been a while since I made a Spanish-style neck joint, and there's a rhythm to it that takes a few steps to get back into. Started by cutting the sound hole — the doubler patch means cutting about 4mm deep, which is too much for one pass with the LMI circle cutter. And one bad feature of that tool: you have to back out the radius to get the hex wrench on the blade's set screw. After the initial knife cut I just switched to the router and left enough wood to keep the pilot hole centred. Nice clean knife line on the top surface.
Marked and beveled the sound hole patch to look good from the front, then trimmed the neck side of the top close to the final profile to fit on the neck heel.
For the linings: grabbed a sycamore side from my stash of orphaned sides bought over the years, bent it and ripped it for solid top linings. Also had a pre-bent East Indian Rosewood side that had been hanging around for a few years — popped it back into the bender and ripped it for fancy laminated linings. Used LMI yellow glue and the mold with another bent side as a caul. Never enough clamps — had to do one lining at a time.
By hook or by crook, got the solid linings in the top and reverse kerfed linings for the back. During the lining glue-ups I made the fretboard and worked on cleaning up the headstock. Glued a 1mm thick strip on the bass side of the fretboard and thickness-sanded it — now the bass is 1mm thinner than the treble.
Re-radiused the back of the rims and profiled the fretboard. Removed the sides from the solera — ready to profile the neck tomorrow and finish the rims with the mass support block and side reinforcement strips.
September 9th, 2016 — Falcate Braces, Back Bracing & Mass Blocks
Big session. The rims are nearly ready, the back is braced, and there's one remaining brace for the top. Added the mass blocks to the rims — these allow tuning down the top resonance after the instrument is finished. Also added side reinforcement strips. Used De-Glue-Do to clean off the hardened squeeze-out. Got a bit sloppy on this build.
.jpg)
De-Glue-Do cleanup — the price of working fast
Ripped a batch of 1.7mm Engelmann spruce strips and bent them on the hot pipe. The Engelmann bent remarkably easily compared to the German spruce on my last classical — I was amazed at the difference. Used West System 105/206 to laminate the falcate braces on the forms. Next day: ripped them in half on the bandsaw, sanded them flat, and prepared to epoxy them to the top.
Mise en Place — Epoxy SessionsEverything gets staged before mixing the epoxy. Once mixed, I try to work quickly, but more and more I'm trying to be neater about it. On this guitar: 10mm for the main falcate braces, 7mm for the secondary. All braces need to be profiled before capping with CF tow.
It took two sessions but ultimately got them all epoxied and profiled. Forced the top to follow the solera before laying on the carbon fibre — the solera has a 2mm dish in the lower bout.
The back is more conventional. Pre-profiled the back braces with a 22.5° chamfer bit as per the book. Bracing it as an active back with three transfer braces and a set of radial braces. Used a combination of plane and radius brace sander for the radius, then glued up in the vacuum box on a 15-foot radius disk.
September 11th, 2016 — Upper Transverse Brace & Closing the Box
The upper transverse brace is always a bit of a pain — every brace that crosses its path needs to be inletted. Clamped the brace down, carefully marked each crossing with a scalpel, then used a razor saw and chisel to make the cutouts. I've finally learned, after many guitars, how to keep the saw straight up and down. Set the brace right to the cut line in the vice and used the vice as a stop.
No CF on this brace, so I could have used yellow glue, but stayed consistent and epoxied it down. Profiled it afterward (no pictures of that step). Then final prep on the rims: notched rebates for the lateral braces on both back and top using a pencil mill grinder, and cut a rebate for the end graft with a scalpel and razor file.
.jpg)
Upper transverse brace clamped — all braces now inletted and epoxied
I have some Petros Guitar Shop Purflex that will match the maple purfling on the bindings and the ebony binding. Before routing for the bindings I wedged in a strip of ebony so the binding machine had a smooth surface to register against.
With everything ready, started closing the box. Glued the sides to the top with the neck clamped to the solera to force the correct neck angle — but the angle doesn't really get locked until the back goes on as well. Cleaned the inside, routed the top overhang flush, then clamped on the back.
.jpg)
Box closed and cleaned up — next up, the bindings
September 11th, 2016 — Bindings
The back bindings are simply ebony with a maple purfling. For the top I wanted a multi-line purfling stack to give it that traditional classical look. Tried adding some red and green lines from the rosette but just couldn't make it work — ended up with a black, rosewood, and maple stack that I'm happy with.
.jpg)
Binding stacks — ebony with maple purfling for back, multi-line stack for top
Carefully set the binding jig cutter depths and routed the back. Had a bit of chip-out right on the outside curve of the upper bout — about 3/16 inch deep and an inch long. Found the pieces but it would have been a mess to reassemble. Luckily I had the cutout from right next to the chip, so I cleaned the area straight and square with a chisel and glued on a small strip. Invisible repair.
.jpg)
Chip-out repair on the upper bout — the repaired area is right above the chisel handle
Spanish Neck Joint PainThe biggest hassle with a Spanish neck joint is having to install the bindings with the neck already on. I start with a scalpel and a template to continue the binding line onto the neck heel area, use a purfling cutter on the sides, deepen with a razor saw, and clear waste with 1mm and 2mm chisels. It is, every single time, a real pain. A forum member suggested a miniature Lee Valley shoulder plane for this — ordered one along with a miniature router plane. Worth a try.
.jpg)
Test binding seated — the channels work
Used a scarf joint at the bottom and a butt joint at the top. When working with a scarf joint I install the binding with the inward cut first — that gives a solid notch to insert the second piece into. Really able to push it tight that way.
September 22nd, 2016 — Bindings Complete & Finish Prep
Finished the bindings, added a scrap piece of Purflex for the end graft, and started finish preparation. Still need to make the bridge.
September 26th, 2016 — Pore Fill, Finish & Bridge Blank
Pore filled with Z-poxy on the back, sides, and neck, followed by three wipes of shellac as a seal coat. The finish plan: French polish the top with shellac, then pad on Royal-Lac for the back, sides, and neck. Also started the bridge — laminating three pieces from a Brazilian Rosewood blank with CF fabric between them.
Why the CF Bridge on a Classical?A question came up about why the bridge blank requires so much work. The falcate brace pattern removes the lower transverse brace — from the upper transverse brace all the way to the tail there is essentially no bracing across the centre line. The bridge forms that cross-brace. On a classical guitar where you want the bridge as light as possible, the two layers of separated CF fabric provide significant cross-grain stiffness for very little added weight. On the classical guitars I see nearly a 10 Hz increase in top resonance after adding the bridge — the opposite of what usually happens. Normally, adding bridge mass lowers the top's resonance. In this case the CF-reinforced bridge is adding more stiffness than mass.
September 30th, 2016 — Bridge Carving on the Mini Mill
Got to play with the mini mill. Used it to make a drill template for the classical string holes and to do much of the bridge carving. Learning to square the vise, deal with backlash in the X and Y table, and use the various clamps was part of the fun. Once set up, it was great to just dial in each string spacing by moving the X-axis rather than measuring and marking. When I finished, the last hole was spot on — closer than my ability to measure and mark by hand.
.jpg)
Pre-layup for the bridge blank — Brazilian Rosewood layers separated by CF fabric
Used the mill to separate the saddle block from the tie block, cut the rebates for the bone strips in the tie block, and cut the saddle slot. Used the Luthier's Friend to make the wings.
October 7th, 2016 — Strung Up & First Readings
The guitar is strung up. Still needs a proper setup and a final sand and polish in another couple of weeks, but it's making sound.
.jpg)
First strings on — Hauser-style falcate classical, Brazilian Rosewood and Lutz Spruce
Finished the French polish on the top with shellac and padded Royal-Lac on the neck, back, and sides. After a couple of days, glued on the bridge: re-located it, drilled a couple of pin holes, and used an undersized tape mask in the bridge location to make clearing the finish easier. With the bridge pinned, I traced its outline in the shellac with a fresh scalpel. Easy to peel the remaining strip of finish with a sharp chisel from the cleared area to the scalpel line. Vacuum-clamped the bridge down and cleared the squeeze-out after about four minutes.
Fretted with EVO fret wire, made a nut, and strung it up.
First Acoustic MeasurementsTop resonance target T(1,1)2: 190 Hz. Current reading strung up: 194 Hz. The back is high at 159 Hz without a strong peak. Plan: shave the back braces until I either hit 4 semitones above the top or the top drops to 190 Hz. Neck angle was spot on. Bass action is 4mm with the string 11mm over the soundboard at the saddle — right on target. The saddle and nut, both built to spec off the guitar before assembly, are very close to final.
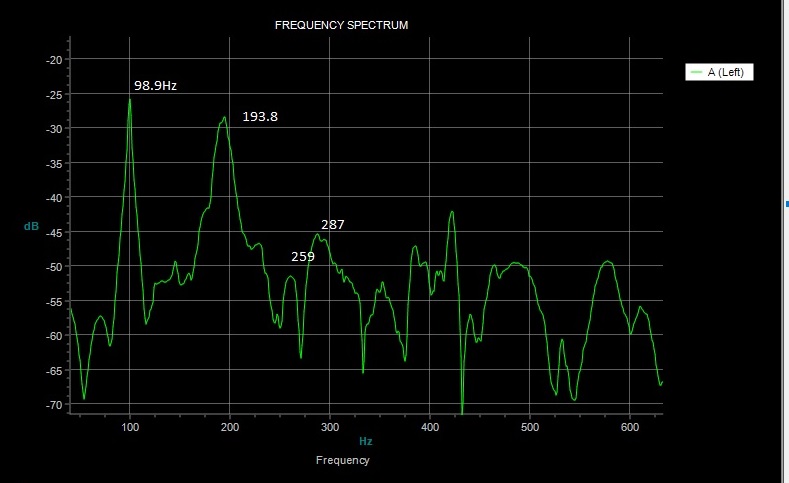
First frequency response with strings — T(1,1)2 at 194 Hz, target 190 Hz
A lot went right on this build. The question I started with — whether falcate bracing translates to a traditional classical form — is looking like a yes. The next step is getting the back resonance dialled in and living with the guitar for a while to see how the sound develops.
October 16th, 2016 — The Finished Guitar
French polish on the top is done, Royal-Lac on the body is buffed out, and the guitar is complete. Brazilian Rosewood and Lutz Spruce — falcate braced on a traditional Hauser classical form.
.jpg)
The finished guitar — Brazilian Rosewood / Lutz Spruce Hauser Falcate Classical
.jpg)
Brazilian Rosewood back — French polish and Royal-Lac
.jpg)
Falcate bracing on a traditional classical platform — question answered
Brazilian Rosewood / Lutz Spruce — Hauser Falcate Classical
Body StyleTraditional Classical · Hauser-Inspired
TopLutz Spruce
Back & SidesBrazilian Rosewood
BracingFalcate — CF Reinforced · Gore / Gilet
BackActive — 3 Transfer Braces · Radial Braces
BridgeBrazilian Rosewood · CF Laminate
Bridge PlateCF Woven Fabric Laminate
NeckSpanish Joint — LMI Classical Neck
FretboardEbony · Bass Taper (1mm)
Fret WireEVO Gold
RosetteClassical — Pre-Made
BindingEbony · Maple Purfling
Top PurflingBlack / Rosewood / Maple Stack
End GraftPetros Purflex
Linings — TopSolid Laminated — Sycamore / EIR
Linings — BackReverse Kerfed
Side Mass BlocksResonance Tuning — Brass Insert
Pore FillZ-Poxy
Finish — TopFrench Polish (Shellac)
Finish — BodyRoyal-Lac (Padded)
Back Radius15 Foot
Top Resonance194 Hz (Target: 190 Hz)
Build PeriodAugust – October 2016
.jpg)
.jpg)
.jpg)
.jpg)
.jpg)
.jpg)
.jpg)
.jpg)
.jpg)
.jpg)
.jpg)
.jpg)
.jpg)
.jpg)
.jpg)
.jpg)
.jpg)
.jpg)
.jpg)
.jpg)
.jpg)
.jpg)
.jpg)
.jpg)
.jpg)
.jpg)
.jpg)
.jpg)
.jpg)
.jpg)
.jpg)
.jpg)
.jpg)
.jpg)
.jpg)
.jpg)
.jpg)
.jpg)
.jpg)
.jpg)
.jpg)
.jpg)
.jpg)
.jpg)
.jpg)
.jpg)
.jpg)
.jpg)
.jpg)
.jpg)
.jpg)
.jpg)
.jpg)
.jpg)
.jpg)
.jpg)
.jpg)
.jpg)
.jpg)
.jpg)
.jpg)
.jpg)
.jpg)
.jpg)
.jpg)
.jpg)
.jpg)
.jpg)
.jpg)
.jpg)
.jpg)
.jpg)
.jpg)
.jpg)
.jpg)
.jpg)
.jpg)
.jpg)
.jpg)
.jpg)
.jpg)
.jpg)
.jpg)
.jpg)
.jpg)
.jpg)
.jpg)
.jpg)
.jpg)
.jpg)
.jpg)
.jpg)
.jpg)
.jpg)
.jpg)
.jpg)
.jpg)
.jpg)
.jpg)
.jpg)
.jpg)
.jpg)
.jpg)