
|
First Flamenco Guitar Blog:
July 6th 2019
Paco's method is to glue the top to the neck, I normally glue the rims to neck first. Paco's way is very traditional. I normally use linings ot kerfed linings on the top in classical guitars as I want the rims really well supported as to not bleed energy into the sides. So normally I completely build the rims and neck assembly before gluing the top and back. Flamenco wants to be a little looser, so instead of linings tentallones are used; will be pictures later.
Before I can glue on the neck I need to route away the portion of the heel that the top sits on. The top is flush with the face of the neck so a recess need to be cleared for it. I use the top to set the depth of the router. When I route I will keep a portion of the base on the neck face to cut out the correct sized rebate. Sorry no picture of the routing just setting the bit height.
.jpg) Even though the neck will ultimately be tilted the neck needs to be glued flat to the top. When the back is glued on in the solera the neck will be tilted slightly setting the neck angle the top happily bends to accommodate. I could not use my solera as it has a tilt for the neck. See below
Even though the neck will ultimately be tilted the neck needs to be glued flat to the top. When the back is glued on in the solera the neck will be tilted slightly setting the neck angle the top happily bends to accommodate. I could not use my solera as it has a tilt for the neck. See below
.jpg) So I just drew a straight line on a board and used it in the alignment and glue up of the top to the neck.
So I just drew a straight line on a board and used it in the alignment and glue up of the top to the neck.
.jpg) I spent a bunch of time making sure the neck was on straight using the center line on the top and line drawn on the work board.
I spent a bunch of time making sure the neck was on straight using the center line on the top and line drawn on the work board.
.jpg)
.jpg) Just like downtown.
Just like downtown.
.jpg) Making a gluing down the tentallones was a pain in the ... Not hard but mind numbingly boring. The keen eye will note that the ones in the lower bout were a little farther apart. That was to make that interface a bit looser.
Making a gluing down the tentallones was a pain in the ... Not hard but mind numbingly boring. The keen eye will note that the ones in the lower bout were a little farther apart. That was to make that interface a bit looser.
.jpg)
.jpg)
.jpg)
.jpg) But another milestone
But another milestone
.jpg)
.jpg)
July 8th 2019
I fit the back to the guitar and cut out rebates for the backs braces (sorry no pictures) but look at one of my other builds as I have documented it a bunch. But here I am ready to glue the back on. I spent some time cleaning up the inside with sandpaper and removed any glue with chisels and scrapers.
.jpg)
.jpg) The back fit with little play, but I still spent time making sure that the neck and tail were lined up correctly. The center strip in the back really shows off any misd alignments.
A few clamps were used to glue it onto the solera. I have one clamp holding the neck down on the solera to force the neck angle. The neck angle of a spanish heel guitar is set when the back is glued on.
The back fit with little play, but I still spent time making sure that the neck and tail were lined up correctly. The center strip in the back really shows off any misd alignments.
A few clamps were used to glue it onto the solera. I have one clamp holding the neck down on the solera to force the neck angle. The neck angle of a spanish heel guitar is set when the back is glued on.
.jpg) Before routing the binding channels I leveled the rims. The bind jig indexes off of the sides so any irregularities can show up in the route. Also you do not want to be sanding the rims level after the binings are in as you will thin the bindings. I mark up the rims with a pencil and sand it off looking for low areas.
Before routing the binding channels I leveled the rims. The bind jig indexes off of the sides so any irregularities can show up in the route. Also you do not want to be sanding the rims level after the binings are in as you will thin the bindings. I mark up the rims with a pencil and sand it off looking for low areas.
.jpg)
.jpg) I routed the channels leaving the area close to and under the neck unrouted. It is tedious hand work to finish off the channel. It is probably the one required step that makes a spanish heel harder than a bolt on. A router is a wonderful tool. I do not have pictures of the hand work on the back but I do have a few for the top.
I routed the channels leaving the area close to and under the neck unrouted. It is tedious hand work to finish off the channel. It is probably the one required step that makes a spanish heel harder than a bolt on. A router is a wonderful tool. I do not have pictures of the hand work on the back but I do have a few for the top.
I use a fancy binding tool to cut the bottom of the channel in the rims. It is index to the top so it can be set and do a pretty straight cut.
.jpg)
.jpg) I then use the top template to help mark out and cut the inside of the channel with a scalpel. I only cut through the top with the scalpel. WIth clean lines on the show edges of the channel it is not to hard to chisel out the rest of the channel.
I then use the top template to help mark out and cut the inside of the channel with a scalpel. I only cut through the top with the scalpel. WIth clean lines on the show edges of the channel it is not to hard to chisel out the rest of the channel.
.jpg) Not pictured but worth noting this guitar has a purfling ledge as well. So I had to move the template and cut that channel as well. I would mark through the top with the scalpel and use a chisel to clear the rest. In any case I got it all installed.
Not pictured but worth noting this guitar has a purfling ledge as well. So I had to move the template and cut that channel as well. I would mark through the top with the scalpel and use a chisel to clear the rest. In any case I got it all installed.
.jpg)
.jpg)
.jpg) A classical guitar has its neck pitched about 2 mm forward to achieve a string height at the saddle of around 11 mm from the top. This flamenco guitar is going to have a string height of 7 - 8 mm. If I was to use the neck angled to lower the height 3 mm I would have to pitch the neck forward another few inches. That is too much so the course teaches to tile the fretboard Removing 2 mm at the saddle side of the fretboard relative to the nut gives about 3 mm reduction of string height. So that is what I tried. Also the bass side is 1 mm thinner than the treble side to help keep the string height above the top more even with the difference in action.
A classical guitar has its neck pitched about 2 mm forward to achieve a string height at the saddle of around 11 mm from the top. This flamenco guitar is going to have a string height of 7 - 8 mm. If I was to use the neck angled to lower the height 3 mm I would have to pitch the neck forward another few inches. That is too much so the course teaches to tile the fretboard Removing 2 mm at the saddle side of the fretboard relative to the nut gives about 3 mm reduction of string height. So that is what I tried. Also the bass side is 1 mm thinner than the treble side to help keep the string height above the top more even with the difference in action.
My first attempt I shimmed up end of the fretboard a bit more than 2 mm and placed smaller shims to help support the fretboard and ran it though the drum sander.
.jpg)
.jpg)
.jpg) You can see the sanding marks moving toward the high corner with multiple passes through the sander (treble nut side)
You can see the sanding marks moving toward the high corner with multiple passes through the sander (treble nut side)
.jpg) It sort of worked but there were two issues. The first is the unsupported wood flexed a bit so the back of the fret board was not level. Also as the work board exited the sander and extended past the belt it put a bit of extra pressure on the trailing edge of the fret board, oversanding it. I did not do a good job supporting the work board as it exited the sander.
It sort of worked but there were two issues. The first is the unsupported wood flexed a bit so the back of the fret board was not level. Also as the work board exited the sander and extended past the belt it put a bit of extra pressure on the trailing edge of the fret board, oversanding it. I did not do a good job supporting the work board as it exited the sander.
.jpg) So I glued a thin bit of ebony on the oversanded edge. I placed the fretboard on a 3/4" plywood and then shimmed the plywood. I also made sure to support it as it exited the sander. This method worked great I got a level fretboard with the correct slopes.
So I glued a thin bit of ebony on the oversanded edge. I placed the fretboard on a 3/4" plywood and then shimmed the plywood. I also made sure to support it as it exited the sander. This method worked great I got a level fretboard with the correct slopes.
.jpg)
.jpg) Here I am at 2 mm. Add 6 mm to get a 3 mm action and we are at 8 mm string height. Life is good.
Here I am at 2 mm. Add 6 mm to get a 3 mm action and we are at 8 mm string height. Life is good.
.jpg) So I glued on the fretboard, and looked to start craving the neck.
So I glued on the fretboard, and looked to start craving the neck.
.jpg) I used rasps, knifes, chisels and for the first time a gouge to carve the neck transition and the heel. I mostly use a spoke shave to carve the neck. Sorry I get into a neck carving zen and did not take many in progress pictures. This spanish cedar was a pain. It carved like butter in one direction and hardly at all in the other direction. I worked around it but it is a pain using and edge tool going up hill in a curve instead of down.
I used rasps, knifes, chisels and for the first time a gouge to carve the neck transition and the heel. I mostly use a spoke shave to carve the neck. Sorry I get into a neck carving zen and did not take many in progress pictures. This spanish cedar was a pain. It carved like butter in one direction and hardly at all in the other direction. I worked around it but it is a pain using and edge tool going up hill in a curve instead of down.
.jpg)
.jpg)
.jpg) Here is where I got to.
Here is where I got to.
.jpg)
.jpg)
.jpg)
July 11th 2019
More progress on the flamenco. I used my Micro Mill to rough out a bridge.
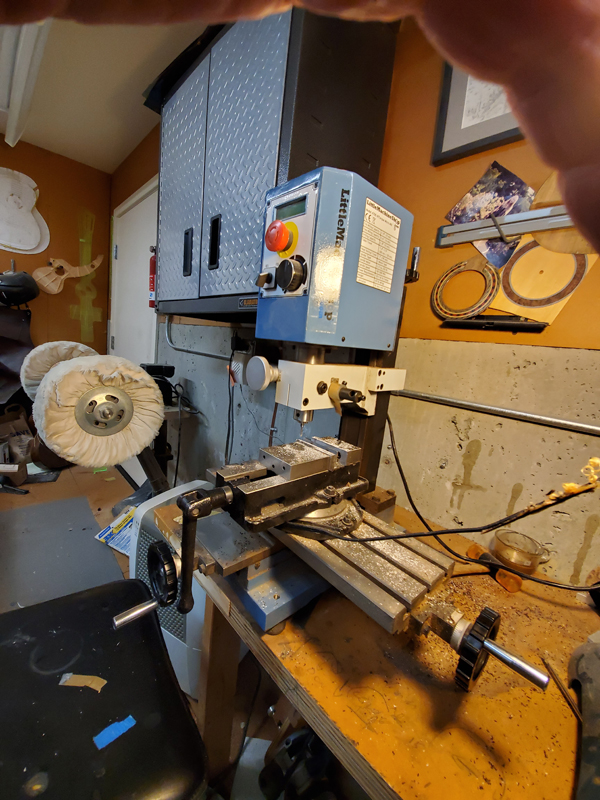 I have been working with a 1/8" end mill. Here are some pictures of me making the bridge with some descriptions
I work the tie block starting with the bottom of the bridge and work forward into the bridge. That way I can keep going in the same y direction without having to come back and zero. The tool is accurate to .001" if you deal with the backlash. So my first cut is a 2 mm deep cut 2 mm in for the tie block bone strip.
.jpg) Testing the size
Testing the size
.jpg) The next cut is the for the inside tie block strip. I am constantly converting mm to mils. So to move forward I wanted the back of the end mill to end up at 8 mm in. Once I calculated the distance I crank it in 50 mils per turn. I have a very accurate vertical adjustment that I bought extra with this machine. With it I can easily get 2 mills accuracy.
The next cut is the for the inside tie block strip. I am constantly converting mm to mils. So to move forward I wanted the back of the end mill to end up at 8 mm in. Once I calculated the distance I crank it in 50 mils per turn. I have a very accurate vertical adjustment that I bought extra with this machine. With it I can easily get 2 mills accuracy.
I move in another 2 mm, and did a 2 pass 3 mm cut for the separation between the saddle block and tie block. I made this all the way across the bridge as this left 4 mm, the thickness I wanted the wings.
.jpg)
.jpg)
.jpg)
.jpg) I used a file to round off the wings, also not shown chisels to angle back the saddle block on eanc side.
I used a file to round off the wings, also not shown chisels to angle back the saddle block on eanc side.
Scraper to put the 20 ' radius on the bridge
.jpg) I used a chisel sharpening jig to put an even bevel on each side.
I used a chisel sharpening jig to put an even bevel on each side.
.jpg) I drilled the holes on my pillar drill angling the bridge 3 degrees to make the string path work.
I drilled the holes on my pillar drill angling the bridge 3 degrees to make the string path work.
.jpg) A little clean up with sand paper and scrapers and a 15 gram bridge.
A little clean up with sand paper and scrapers and a 15 gram bridge.
.jpg) I used my center finder and a ruler to place the bridge and make a mask.
I used my center finder and a ruler to place the bridge and make a mask.
.jpg)
.jpg) It looking OK. I am away for a few days but will come back and french polish the instrument next week.
It looking OK. I am away for a few days but will come back and french polish the instrument next week.
.jpg)
.jpg)
.jpg)
.jpg)
.jpg)
Next
|
|

|
|
|