Falcate Classical Guitar Build Blog:
Febuary 16th 2015
I am just starting to work on the bolt on bolt off neck for a classical design. I am going to follow as closely as I can the method laid out in the Contemporary Acoustic Guitar Build book. At least after reading this section in the book three times, I find that this process is one of the more complex areas to understand the geometry. The complexity arise do to an inherent conflict in the design task: A bolt on, bolt off neck with bolts in the fret board extension area requires that the top and fret board board are co-planer (like a SS). The conflict is that the top of a classical guitar fret board should be pitched forward such that an imaginary straight edge on the plane of the neck should end up 2 mm under the top at the saddle location. That is the neck should be pitched forward, about as much as a neck is pitched back on a SS.
Classical guitar builders working on a solera in the Spanish style often deal with this in one of 2 ways: have no neck angle and make the fret board into a wedge thick on the nut side. If the FB is sloped such that it loses 1 mm by the 12 fret then the above described 2 mm would be achieved at the saddle location. I did this on my first classical and it would be a compatible solution to the bolt on bolt off neck. (The wedge shape of the FP is noticeable though) The second option is to pitch the neck forward such that the nut would be 2 mm above the plane of the top. In this case the neck and top are not co-planer so a reverse wedge needs to be sanded into fret board extension so that the FB will fit properly. This is how I built my second and third classical guitar. Not compatable with the bolt on bolt off neck.
Moving away from the solera or workboard to using a mold, alternatives like an elevated fret boards are often used. The design from the book is more along those lines. Simply put the top of the neck is made co-planer to the top and a suitable sized wedge glued between the neck and the fret board and is used to change the FB angle. If a the wood matches and there is a good glue line it should appear as part of the neck. The wedge would be 3-4 mm tall on the nut end sloping to zero at the bottom of the fret board.
While this sound simple, it creates a few complications that would need to be dealt with. The obvious one is that without modification the neck will feel 4 mm thicker than it should at the nut, so the neck taper will need to be modified thinner on the nut side. Removing 4 mm from the neck would put a truss rod closer to the back of the neck than desired. Also the nut slot would appear to be 9-10 mm deep (half of the neck width) which would appear weird. It is these complication that make this procedure tricky.
The nut depth is solved by extending the wedge past the nut end of the fret board and planing it to the slope of the head stock, In effect it becomes a part of the head stock and the neck and the head stock veneer is glued on to it. if you draw this out you will find that the fret board has to be placed a bit farther away from the original angle break where the head stock starts.
If one is using a truss rod, then with the wedge glued to the bottom of the fret board; the truss channel is routed with a slope in reverse of the wedge and a reverse matching channel needs to be routed in the wedge. So at the nut end part of the truss rod is in the neck part of it is in the wedge. Thus the truss rod will be at or close to the bottom of the fret board the whole length.
As I said I am just starting this work and if you follow the blog you will see the above work happen as the guitar progresses. At this point I have cut a glued the scarf joint to form the 15 degree angle I am using.
.jpg)
.jpg)
.jpg)
.jpg)
Febuary 16th 2015
I am sort of stuck again with two long epoxy cure waits so you get another post.
Bit by bit I am finding there are little things between clean craftsmanship and my usual work. On the falcate brace design the falcate braces pass through a rebate in the upper transverse brace. On my previous two falcate guitar my work was not as tight as it could have been. The problem had been that I was a bit sloppy marking where the rebates should be. My brilliant light bulb moment was to take the 1.4 second I needed to clamp the brace as shown before I attempted to mark the 4 corners of the rebate.
.jpg)
With the brace stable it was really easy to take the time to make really clean tight marks on the brace.
.jpg)
Not shown but I measure the height of each brace on the top and marked the height on the transverse brace. Then it was easy to put the brace in my parrot vice with the jaws right on the marked depth line. I used a razor saw to both cut the out line and some inside cuts to make clearing the channel with a chisel easy.
Much better this time
.jpg)
.jpg)
This brace was clamped flat
.jpg)
I had some extra epoxy after gluing down the transverse brace so I used the excess to glue the heel block on to my neck blank.
.jpg)
I also went ahead and completed the top profile on the rims by first using the radius dish to mark a 32 ft radius on the rims. I planed the neck side and the bottom side close to my line and used the 32' sanding dish to clean up the profile.
Because I want the top with very little angle I then flattened the upper bout mostly with a plane. I think a straight edge on the top following the neck block extension will be 1 maybe 2 mm above the top. I will use the wedge I talked about in the last post reverse that slope.
.jpg)
Febuary 19th 2015
I just closed this guitar.
While waiting for the previous epoxy to cure I did end up radiusing the top rims to 32'. I then flatten the upper bout as the to of a classical really should be nearly square to the the rims on the neck side. I did most of the profile with a plane. The rims were already level, so I did not want to go totally with the sanding dish. It is really easy to go heavy on the neck side and round back the top rims near the neck joint. I place the rims top down in my dish and used a pencil against the dish to mark out the profile. I did clean it up of the radius dish. A lot less sanding so less time to make errors.
One last epoxy layup step is to apply a couple of CF rows to the transfer brace.
.jpg)
.jpg)
Not shown but I used l pencil mill grinder to route out the linings to accept the top and used a bunch of clamps to glue the top down. I did not use a caul on the top, Just a bunch of Cam clamps and violin clamps.
.jpg)
.jpg)
I routed off the overhang and prepared everything to glue the back on.
I vary carefully aligned the back to the rims to make sure the center strip matched the center of the neck and and the end graft. With the back clamped on I used a scalpel to mark where the braces need to be inlet into the kerfed linings.
.jpg)
.jpg)
I used the 32' radius dish as a gluing caul when I glued the back on, Keeping the mold, the spreader clamp and the using the dish as caul helped me make sure the sides were aligned when I glued the back on.
.jpg)
.jpg)
.jpg)
.jpg)
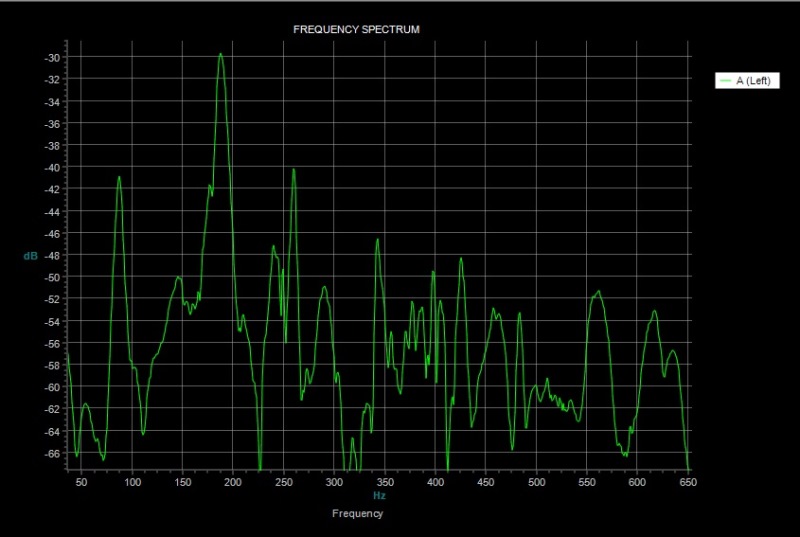
The resonance frequencies will change as the guitar is finished with a bridge and strung but I tapped it to see what it is doing at this point. It looks sort of wild to me. I see a clear peak at about 87Hz T(1,1)1 the top is at about 187Hz T(1,1)2 and the back was 238Hz T (1,1)3. It looks like the cross dipole was at about 257Hz. The taps do sound good.
It will be interesting to see the tap after I get a neck and bridge on and string it up.
Febuary 22th 2015
I think this neck is one of the more complicated components I have made for a guitar. With the fret board glued to the 4mm thick wedge blank, I was able to route the top half of the truss rod slot. This slot was routed level to the fret board, really just under it. Ultimately when I turn it into a wedge the top slot will match the angle of the slot in the neck.
.jpg)
.jpg)
I still do not have the wedge planed but you can see the fret board assembly caps the truss rod.
.jpg)
.jpg)
Here you can see how I extend the head stock with the excess wedge wood past the fret board.
.jpg)
I was nervous about planing the wedge but as long as I did not cut the leading edge. the plane was big enough to allow me to take the trailing edge down to nothing with a perfectly straight wedge. In the pictures you can see that I made a guide wedge to go in front of the fret board but I am not sure I needed it.
.jpg)
.jpg)
.jpg)
.jpg)
Now on to more normal neck making tasks, I do need to make the neck 4 mm thinner at the nut side tapering to a normal thickness near the heal to adjust for the wedge.
Next up is thicknessing and shapping the head stock thicknessing the neck, cutting the tenon, carving the heal and tapering the fret board
Also I have the body ready to route the bindings, the sides have been sanded level.
.jpg)
.jpg)
Febuary 28th 2015
It is starting to look more like a guitar. I have the neck thicknessed and profiled ready for the headstock veneer and final carving. It taking a bit to finish up the neck, also I went ahead and finished the binding and pruflings. Now I think I am position to carve it tomorrow.
.jpg)
With the 4 mm thick wedge on the fret board I needed a steeper taper on the back of the board than I normally would have. The book made use a taper board to set the angle, I just temporarily put a 7 mm shim at the nut, 3 for the normal taper and 4 to take the wedge into account. Then I just ran it under my Safe-T planer.
.jpg)
.jpg)
.jpg)
The head stock I did as I normally do .
.jpg)
With the mortise and routed and cut I installed brass inserts and holes in the heel block. I was then able to play around with the neck and fret board to make sure the neck was centered and at the correct angle. My body angle was a little more than I hoped so ultimately I sanded a slight taper on the fret board to correct it.
.jpg)
.jpg)
.jpg)
.jpg)
Once happy with neck and and center with the neck bolted on the guitar. I routed out the area for the fret board extension block in the body and into the neck. Here you can see why the neck face needs to be in plane with the body. Often on classical guitars it is not.
.jpg)
.jpg)
.jpg)
.jpg)
.jpg)
.jpg)
.jpg)
Put a bit of silicon calk in the truss rod slot and glued down the fret board and wedge assembly.
.jpg)
Here you can see I am starting to plane the bit of extended wedge I had in plane with the head stock
.jpg)
.jpg)
Now the head stock extends right to the back of the nut slot
.jpg)
With a little clean up you can see the wedge blends into the neck
.jpg)
Next
| 