An up-and-coming guitarist/musician I know through one of my guitar instructors commissioned me to build an 8-string nylon crossover. I worked out a design based on one of the nearly classical-sized guitar body shapes. The guitar will be a venetian cutaway with a 14-fret body join. I'm going to use a 660mm scale to push the saddle down toward the center of the lower bout — I usually build this with a 12-fret body join. The guitar will be falcate braced with a live back.
The back and sides are built from some wild Bocote I bought on the OLF. The top is an amazing piece of Sitka Spruce — it tap rings clearly for over 6 seconds, and the plate would start ringing just from running a finger across it.
Wild Bocote — bought on the OLF, highly figured
The plates once sanded to remove saw cuts at 2.6mm were close to the edge of being too thin. I tried to use tap tones to get the target thickness but was having trouble reading coherent resonances, so I measured the long-grain and cross-grain Young's modulus using a deflection jig. Using those values — from the Gore/Gilet books — I came up with a good target thickness.
I joined the plates and decided to stabilize them — a wash coat of naphtha showed areas in the figure where it could seep through. I did several applications of thin CA until the figured areas were filled and stable. I then used tap tones to determine the Young's modulus of the top wood and its target thickness.
✦
January 28th, 2018 — Bending the Cutaway
I pulled some less figured Bocote from my stash for the sides — a good color match and less risky to bend. The normal side bent without any issues, so I decided to attack the cutaway side.
I thinned the upper bout just past the waist to .070". I also sprayed the side with Super Soft 2 and let it sit overnight. I bent it in a side bender with a cutaway attachment, always careful to hold the cutaway press up — once I had it fall and snap a bunch of bindings I was going to bend. While the wood is heating I also warm the underside of the cutaway to make those tight bends possible.
No loud cracks!
Amazingly, a clean bend. I glued on a tail block and started to make braces and the heel block.
Tail block on, braces and heel block in progress
✦
March 5th, 2018 — Rosette
While waiting for some bindings on the classical guitar I made progress on the 8-string. I decided on a pretty simple rosette using a rope purfling and a wood ring cut from the Bocote back offcuts. I used an LMI rosette circle cutter to mark out the inside and outside channels, and also scored the sound hole.
To install the rosette I routed channels for the inside and outside bindings — the purfling strip and a black fiber strip were exactly 1/8" together. I cut the outside channel on the top, then keeping the same router setup made a matching channel on the wood ring blank, followed by the inner channel on both. Before gluing anything I carefully sealed all channels with Seal-Lac to prevent CA from wicking into the top grain.
I bent the rope purfling on a hot bending iron to close to the circle shape, then worked around using a 1/4" steel pin to push in the binding. The fiber strip was guided in first, then the rope purfling followed. I ran the wood ring blank upside down through the drum sander until the ring dropped out — sized perfectly to fit.
✦
March 5th, 2018 — Back Bracing
I braced the back using stock I made earlier in the year — dimensioned brace stock run through a 22.5-degree router bit to make a house shape. First I installed the back strip, then prepared it for the braces. I use a 10' radius for the back — as it's pretty tight I mark the radius on the braces, get very close with a plane, and clean them up on a radiused sanding jig.
Clever Caul TrickI made gluing cauls for the shaped braces by gluing two small cutoffs of the brace stock together at their base — a perfect fit for the house-shaped profile, no custom shaping needed.
✦
April 13th, 2018 — Rims Complete
After two weeks in Chicago helping my mom in rehab from a stroke, and then about a month in Thailand and Laos, I managed to finish the rims today. As this is a new body shape for me I needed to lay out the heel block — this guitar will have a bolt-on/bolt-off neck so it has a heel block extension. I used the rims themselves as a template for the block, shaped it on the bandsaw and belt sander, then glued it in place and installed an end block.
End block in — both blocks installed and square
I sanded the top rims to a 40' radius (previously I used a 32' but I don't want to pre-tension the top as much). The back is radiused to 10'. I ended up using the band saw to cut about a quarter inch off the installed heel block as I had made the sides a touch too tall — managed to get away with it. I used reverse kerfed linings for the top.
New Lining ApproachI tried something new — making the side braces the same height as the kerfed linings, then instead of notching the back linings around the side braces, I installed the side braces first and filled in the AST A4 linings around them.
Rims complete — ready for falcate braces tomorrow
✦
April 19th, 2018 — Making the Falcate Braces
With back and rims complete it's a good time to brace the top. Because this top uses laminated carbon-fiber-reinforced falcate braces it takes a couple of days — the epoxy needs to cure between steps.
I had to really search for tall enough brace stock — I needed at least 1" so I could laminate and form a blank wide enough for two braces and rip it when finished. Most brace stock available was only .75–.8". I eventually found a supplier sending split portions of log: plenty tall enough and nicely quartered.
Tall quartered brace stock — split from the log, not kiln-dried sawn stock
I ripped a bunch of 1.7mm strips, bent them on a form, and laminated them on the falcate brace forms. I use wax as a release on the form.
Once cured I ripped them on the band saw and cleaned them up on the flat back of a radius dish. I use my Ken Pickou "The Otter" routing table to groove the braces just deep enough to inlay the carbon fiber. Since there were three laminates and my bit was close to 1.7mm, I used a scrap laminate strip to offset the fence. My depth was a tad deep so I route and then sand until they are just the right depth.
As I need to handle the top a lot I cut out a 5mm cover for it, and also taped over the sound hole routing area. I work with the gobar deck on the bench with plenty of light. Before gluing down the falcate braces I get everything ready — small brush for epoxy, wiping my gloved hands between steps to keep things clean.
✦
April 22nd, 2018 — Top Bracing Complete
Nearly finished with the top. I epoxied on the remaining straight braces — all with carbon fiber underneath. I had notched the narrower braces for the CF tow but didn't bother with the wider sound hole braces. The following morning I profiled the braces — mostly a plane for the falcate braces and a chisel for the smaller ones. The main falcate braces are 10mm and the secondary falcates are 8mm. I'll probably end up with a top resonance between 180 and 190 Hz. I normally brace a classical for 190–200 Hz but I want to help the bass out a bit since this guitar has two extra bass strings.
To fit the transverse brace over the falcate and sound hole braces I carefully position and clamp it to the braced top, then use a scalpel to accurately notch the locations of the sound hole and falcate braces onto the transverse brace. Taking it to my parrot vise I position the brace at just the right height, use a razor saw to cut the edges of the rebate, and a chisel to clear the waste. This method let me fit the brace in one go.
Final glue-up — CF tow on every brace, transverse brace going down
Top bracing complete — falcate with carbon fiber, target resonance 180–190 Hz
✦
May 10th, 2018 — Closing the Box
I started to close the box. To get here I had to profile the top's upper transverse brace and fit both top and back to the rims, routing pockets for all of the transverse braces — one on the top and three on the back. To fit the top and back I place the plate on the correct radius dish and use a scalpel to mark where the braces intersect with the linings, then use a straight edge across the notches to mark the pocket width.
Minor MisplacementI misplaced the transverse brace a bit, leaving a gap between the block extension and the brace. I extended the block extension with a strip of mahogany — visible in later pictures.
✦
May 10th, 2018 — End Wedge & Closing
I wanted to install the end wedge before closing the box, which meant finalizing the binding scheme. The Bocote is so figured I wanted to frame it in black bindings. Given that the horn on a venetian cutaway has such a tight radius I decided to bend the binding first to confirm I'd have a match to the ebony end wedge.
I used Rocklite Ebano bindings from LMI — this material looks and acts like wood but bends more like East Indian Rosewood than like ebony. It can be over-bent so the spring-back lands to shape. I bend two bindings at a time, taped together purfling to purfling.
For the end wedge I cut an extra-long piece from a scrap of ebony — planned with a maple purfling to match the bindings. I marked the rims with a scalpel, completed the cut with a razor saw, and chiseled out the waste to the end block. Once the channel was cut I clamped in the wedge with the purflings, tapped it tight with a hammer, and flooded the clamped wedge with thin CA. A plane and then a scraper brought it flush.
With the back fit confirmed and all pockets corrected with a chisel, I put a bead of glue on the rims and blocks and clamped the back on — rims still in the mold for squareness. I finished the sound hole (it was mostly routed), beveled the edge so the top doesn't look twice as thick in the sound hole, then glued on the top with cam clamps plus a few violin clamps where I ran short.
Box closed — wild Bocote sides, venetian cutaway, ebony end wedge with maple purfling
✦
May 21st, 2018 — Binding Complete
I finished the body including installing the bindings and purflings. I hate binding a guitar — I'm getting better but I always find something to deal with later. In this case there were a couple of places where I chipped out the sides on the bottom of the binding channel. Fixable, but still.
I did learn something on this guitar: I decided not to route the binding channel until the rims were essentially finish-sanded. There's nothing worse than sanding out a low spot after routing and trying to do it without thinning the binding. I leveled the rims with a cabinet scraper and sanding blocks, and used a shellac wash coat trick to find low spots — they stay shiny when you sand the shellac off.
I hand-finished the binding channel where the cutaway meets the neck using a Karl Holtey Design Purfling Cutter, then cleared the waste with a chisel. I used Titebond hide glue and did only one half of one side at a time.
✦
May 22nd, 2018 — The Gore Wedge Neck
I started (and restarted) the neck for this guitar. Building a bolt-on/bolt-off classical guitar in the Gore style uses a 4mm wedge under the fretboard. Classical guitars often have the neck pitched forward a couple of mm to deal with the geometry — where steel string necks are tilted back to achieve the required string height, classical guitars need the opposite angle.
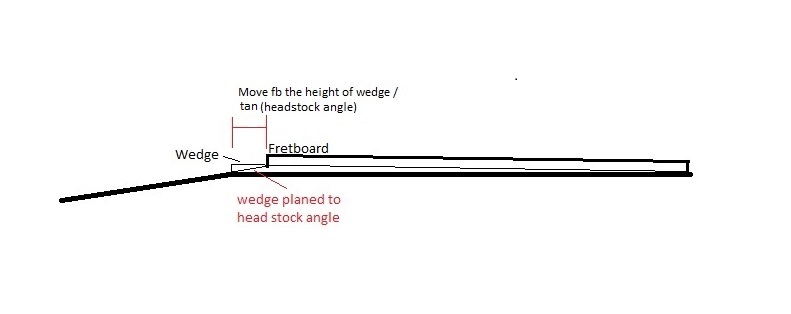
The Gore Wedge — How It WorksThe Gore-style bolt-on neck must be in plane with the upper bout, so the neck can't be pitched forward. Correct geometry is achieved instead with a fretboard-integrated wedge made from the neck material. The wedge becomes part of the fretboard assembly before it's installed on the guitar. When done correctly the glue joint is nearly invisible — the wedge is not seen. The wedge also extends past the nut and gets planed into the headstock angle, which is what makes the geometry work cleanly.
The geometry calculation: desired string height at saddle (10–11mm) = neck plane height at saddle (3mm) + 2× action at 12th fret (2× 2.5mm) + fretboard thickness (6mm) + fret height (1mm) − 1mm fudge for string tension movement − wedge height at nut. Solving this gives a wedge height of 3mm. The fretboard and all related measurements need to be pushed back from the neck/headstock position by 3mm / tan(15°) = 11.2mm.
Gore wedge neck geometry diagram — the wedge integrates into the fretboard assembly
Mistake — Wrong NeckWith all of that careful calculation I happily made a neck blank for a 660mm scale 12-fret body join. The guitar has a 14-fret join. Starting over with all that experience now in hand.
✦
May 24th, 2018 — Neck Joinery
Several steps before I can shape the neck: mortise and tenon, fitting to the body with the correct neck angle, bolt-on brass inserts, truss rod slot in both neck and wedge, and the neck extension and its pocket. I glued a block of wood to the neck to make the neck heel, then cut the tenon cheeks on the table saw — 88.5° to the face of the neck (1.5° back tilt) plus a 5° angle across the cheeks to provide relief for the curve of the rims. I use the Luthier Tool Company end vise to route the mortise in the body.
I use a rabbet plane and chisels to adjust the heel cheeks — I can't stand straight surfaces and get bored with sandpaper. Take care not to blow out the edge of the face of the neck: always plane from the face in, use the chisel from each end, take a cut in the center to level. You can also relieve the edge with a chisel before making the cut with the plane.
I used the drill press for the brass insert holes, transferred the pattern to the body with hole centers, and supported the tenon when setting the inserts to avoid blowing it out. I double-checked the angles with the bolts on, and also checked the neck angle using the fretboard propped up 4mm on the nut side to simulate the wedge — ending up at 8mm at the bridge, which with the 4mm wedge gives 12mm, a millimeter high but the fretboard still needs 0.5mm sanding.
With the truss rod slotted through both neck and wedge blank, and the wedge made and glued on, I planed the nut slot right into the fretboard. Then I fabricated the neck extension and routed the pocket for it in both neck and body. With the neck still bolted in I glued the extension to the neck, then carefully pulled the neck from the body to avoid gluing the extension to the body.
Neck extension planed level — Gore-style bolt-on neck assembly complete for the day
✦
May 31st, 2018 — Headstock & Fretboard
I was so excited at how well the neck worked that I got carried away and glued on the fretboard — unfortunately out of order with a few major steps. I needed to first thickness and taper the neck, thickness the headstock, and install the brass inserts into the neck extension. I was able to work around the already-radiused fretboard for most things.
I used my Safe-T Planer to thickness and taper the neck simultaneously. To remove the rocking caused by the radius I taped on a couple of bindings as shims and figured out a shim size that would make my drawn cut line parallel to the table while tapering. I also used the Safe-T Planer to thickness the headstock — thinning it an extra 2mm and gluing on a back strap.
With headstock veneer, white fiber, and black fiber glued on I taped my template in place and used a combination of bandsaw, plane, and fine rasp to shape the headstock. I relocated the center line and took great care to get both sides symmetrical — the Luthier's Tool slotted headstock jig requires a symmetrical headstock.
My 6-string slotted headstock jig happily does 8 strings in two passes. I set up for the lower 6 tuners, drilled the holes, then slid the jig up one set of holes indexing on the first set, readjusted the sides tight, and drilled the last two holes. Same two-pass approach to rout the full slot. A light sanding removed the mark from one route to the other.
✦
June 2nd, 2018 — Neck Carving
I spent yesterday evening getting the neck blank to the correct squared-off shape from the side view — refining the heel transition, cutting the heel to the correct length, and establishing the neck width. My approach: if I have the neck properly shaped from the side view, carving the neck profile will be a natural process using long cutting strokes following the neck line. I find it much harder to shape separate zones at the 1st and 9th fret and then try to blend the transitions between them.
Switching my bandsaw from a 1/4" to a 1/2" 3 TPI blade made a huge difference — all cut lines clean, the blade doesn't tend to wander. I took it to the bandsaw and cut the side profile very close, using a shim near the nut so the tapered neck meets the blade square. I cut and shaped a bit of Koa for the heel cap and glued it on.
I drew facet lines for a fairly flat classical profile and used a spokeshave for the open areas and a rasp for the areas close to the transitions. Since everything is profiled from the side view I can make long cutting strokes straight through the heel to the neck without any awkward transitions to blend.
✦
June 11th, 2018 — Finish Prep & Logo
I finished finish prep on the body — I tried something new by putting a light wash coat of shellac on the back and sides, then sanding it off with 240P. The low spots don't hide — they remain shiny. This marked a bunch of spots that needed drop-filling: some in the figured Bocote areas of the back and a few on the bindings. With that done I started pore filling with System 3 Silver Tip epoxy.
While the epoxy cured I went back to the neck — added side dots, cut and installed my logo, and rasped the slot ramps. The logo is my standard ebony hawk on a branch in a MOP moon. It took two tries to cut out the moon: the first time I snapped out the beak/neck transition with just a couple of millimeters to go. From now on I'll go the other way at that transition — where there's more pearl intact when I make the cut.
Ebony hawk on branch in MOP moon — flooded with CA, scraped level. Dropped right in, no filing needed.
✦
June 23rd, 2018 — Bridge & Fretting
Before finishing I made the bridge and located it so I could make a mask. The bridge is laminated Brazilian Rosewood with carbon fiber fabric — 3K 5.7oz plain weave. I re-sawed a bridge blank into 4mm, 3mm, and 2mm plates, with CF on both sides of the middle 3mm layer, laminated with West System 105/206 epoxy.
I installed EVO Gold frets and dressed the ends. Because of the bolt-on/bolt-off neck with the supported fretboard extension I can level the fretboard, fret, and level the frets entirely off the guitar — the supported extension assures the fretboard isn't bowed up or down during leveling.
The bridge is based on Trevor Gore's design stretched for 8 strings. I drew an 8-string bridge as my 6-string design extended by two strings, taped a copy to the bridge blank, and trimmed it square. My 6-pin hole jig from the mini mill places string holes at the correct height and spacing. Using the back of a drill bit as an index I moved the bridge one hole to the right then used the same method on the left to drill the 1st and 8th holes. I use the mini mill for the saddle separation cut, the tie block bone rabbet, and the saddle slot; the Luthier's Friend drum sander for the wings; and a chisel for final shaping.
Completed CF-laminate bridge — Gore design extended to 8 strings, Brazilian Rosewood
✦
July 4th, 2018 — Finishing
I made a bridge mask inset about 1/8" from the bridge edges — when ready to clear the finish area I'll pull the tape, place the bridge using the two index pins, and score the finish with a scalpel before chiseling it back to the score line.
I sprayed post-catalyzed Royal Lac for the final finish, mixing the 7-to-1 post-cat ratio in glass beakers I ordered online for $12. I sprayed 4–5 coats per day with an hour between coats. Each morning I leveled the previous day's build at about 85% with 600P paper and mineral spirits as a lubricant, checking for gaps to drop-fill. The finish went on nicely right off the gun with the tiniest sheen of orange peel.
It took a couple of hours to level and buff. By hand with water and a drop of soap as lubricant: 600P → 800P. On the top and back I used a random orbital sander — Abranet P1000 → 2000 Abralon discs — then buffed on the buffer. On the sides I continued by hand at 1200P then the orbital with 2000 Abralon. I was afraid to use the P1000 Abranet disk on the sides as it removes finish quickly. Overall I'm happy with the finish.
Post-catalyzed Royal Lac — leveled and buffed, the Bocote figure reads beautifully through it
✦
July 5th, 2018 — Strung Up!
Just a few remaining steps to get her strung up. I cut a mylar protection for the top — it's nice now and the idea is to keep it that way. I put a 40' radius on the bottom of the bridge to match the radius built into the top, then with the bridge in place on the index pins scored the finish around it and chiseled back to the score line.
Before installing the bridge I installed the K&K pickups, using the index holes to locate the transducers by feel. With the transducers in place I glued the bridge down. I found the center of the tail wedge and drilled a 1/2" hole for the output plug, then cut a guitar cord to pull the pickup plug into the hole.
After waiting a day I installed the tuning machines and strung her up. She sounds good — still needs a proper setup. Currently using .050" and .060" nylon core silver-wound strings for the sub bass, tuned to D and B. I've ordered .054" and .064" strings to try going down in 4ths from E to B and F#.
The Guitar in the Right Hands
✦
Final Specifications
8 String Falcate Nylon String Crossover
TypeCommissioned 8-string nylon crossover
Body ShapeNear-classical, venetian cutaway
TopSitka Spruce
Back & SidesBocote
BracingFalcate — laminated CF-reinforced spruce, 40' top radius
.jpg)
.jpg)
.jpg)
.jpg)
.jpg)
.jpg)
.jpg)
.jpg)
.jpg)
.jpg)
.jpg)
.jpg)
.jpg)
.jpg)
.jpg)
.jpg)
.jpg)
.jpg)
.jpg)
.jpg)
.jpg)
.jpg)
.jpg)
.jpg)
.jpg)
.jpg)
.jpg)
.jpg)
.jpg)
.jpg)
.jpg)
.jpg)
.jpg)
.jpg)
.jpg)
.jpg)
.jpg)
.jpg)
.jpg)
.jpg)
.jpg)
.jpg)
.jpg)
.jpg)
.jpg)
.jpg)
.jpg)
.jpg)
.jpg)
.jpg)
.jpg)
.jpg)
.jpg)
.jpg)
.jpg)
.jpg)
.jpg)
.jpg)
.jpg)
.jpg)
.jpg)
.jpg)
.jpg)
.jpg)
.jpg)
.jpg)
.jpg)
.jpg)
.jpg)
.jpg)
.jpg)
.jpg)
.jpg)
.jpg)
.jpg)
.jpg)
.jpg)
.jpg)
.jpg)
.jpg)
.jpg)
.jpg)
.jpg)
.jpg)
.jpg)
.jpg)
.jpg)
.jpg)
.jpg)
.jpg)
.jpg)
.jpg)
.jpg)
.jpg)
.jpg)
.jpg)
.jpg)
.jpg)
.jpg)
.jpg)
.jpg)
.jpg)
.jpg)
.jpg)
.jpg)
.jpg)
.jpg)
.jpg)
.jpg)
.jpg)
.jpg)
.jpg)
.jpg)
.jpg)
.jpg)
.jpg)
.jpg)
.jpg)
.jpg)
.jpg)
.jpg)
.jpg)
.jpg)
.jpg)
.jpg)
.jpg)
.jpg)
.jpg)
.jpg)
.jpg)
.jpg)
.jpg)
.jpg)
.jpg)
.jpg)
.jpg)
.jpg)
.jpg)
.jpg)
.jpg)
.jpg)
.jpg)
.jpg)
.jpg)
.jpg)
.jpg)
.jpg)
.jpg)
.jpg)
.jpg)
.jpg)
.jpg)
.jpg)
.jpg)
.jpg)
.jpg)
.jpg)
.jpg)
.jpg)
.jpg)
.jpg)
.jpg)
.jpg)
.jpg)
.jpg)
.jpg)
.jpg)
.jpg)
.jpg)
.jpg)
.jpg)
.jpg)
.jpg)
.jpg)
.jpg)
.jpg)
.jpg)
.jpg)
.jpg)
.jpg)
.jpg)
.jpg)
.jpg)
.jpg)
.jpg)
.jpg)
.jpg)
.jpg)
.jpg)
.jpg)
.jpg)
.jpg)
.jpg)
.jpg)
.jpg)
.jpg)
.jpg)
.jpg)
.jpg)
.jpg)
.jpg)
.jpg)
.jpg)
.jpg)
.jpg)
.jpg)
.jpg)
.jpg)
.jpg)
.jpg)
.jpg)
.jpg)
.jpg)
.jpg)
.jpg)
.jpg)
.jpg)
.jpg)
.jpg)
.jpg)
.jpg)
.jpg)
.jpg)
.jpg)
.jpg)
.jpg)
.jpg)
.jpg)
.jpg)
.jpg)
.jpg)
.jpg)
.jpg)
.jpg)
.jpg)
.jpg)
.jpg)
.jpg)
.jpg)
.jpg)
.jpg)
.jpg)
.jpg)
.jpg)
.jpg)
.jpg)
.jpg)
.jpg)
.jpg)
.jpg)
.jpg)
.jpg)
.jpg)
.jpg)
.jpg)
.jpg)
.jpg)
.jpg)
.jpg)
.jpg)
.jpg)
.jpg)
.jpg)
.jpg)
.jpg)
.jpg)
.jpg)
.jpg)
.jpg)
.jpg)
.jpg)