A player I know asked me to build him a 12 string guitar. He really likes the Gore medium body Steel String I built — the size, shape and the sound. This led me to start a 12 string falcate braced guitar. The 12 string presents a number of issues including how to modify the braces to support the increased string load, and a 12 pin bridge would not work with the falcate bracing pattern I use.
After asking for some suggestions on the Australian/New Zealand Luthiers Forum (the home of many Gore followers), a member (woodsy23) modified an existing Finite Element (FE) model he had for 12 string loads, both light and medium (EJ38s and EJ39s). He determined I would need to increase the height of the falcate braces from 7mm to 10mm for the EJ38s and 11mm for the EJ39s. I'll probably stick with 10mm as I want to limit the monopole frequency of the top to keep it in the typical SS range.
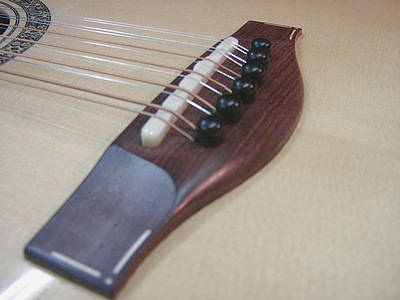
Also from the ANZLF I found a tutorial for making a 6 pin 12 string bridge by Craig Lawrence. Way cool! I had been thinking of going pinless but the bridge below looked pretty cool.
Craig Lawrence's 6-pin 12-string bridge design from ANZLF
My client selected a nice looking set of Ziricote. The wood is pretty, has a nice tap tone but it is very dense — not as dense as Cocobolo but denser than EIR or BRW. This choice may push me away from an active back as it is a lot of mass to get moving. The wood is also supposedly brittle and hard to bend.
The Ziricote back and sides set
Before going any further I decided to see if I could bend the tight Venetian cutaway. To increase my chances I decided to use almost all the tricks for bending brittle wood. The first was a suggestion from a forum: wash one side of each side with naphtha, then turn the board over and mark where the naphtha comes through. This highlights any existing cracks. Then flood the marked areas with thin CA on wax paper.
The sides were thinned to about 2mm (.080") and starting a bit above the waist I used a scraper to take the Venetian cutaway area to .070". I spritzed the sides with Super Soft II and let them sit overnight.
While warming the sides in my John Hall Fox-style bender to about 300 degrees I used a heat gun to warm the inside of the Venetian cutaway. After all of that the bending was uneventful with very little spring back. In the last picture you can see it in the mold with no clamps.
Waiting for the regular side to cool and set
✦
April 3rd, 2016
The second side bending went OK as well but I had a close call. On the cutaway, the non-cutaway side goes about 29mm beyond the center line. I thought my template had taken that into account — it probably did, but I cut my prebent sides closer and closer to actual size as it gives me useful bits of wood. In any case when I put the side in the mold the upper bout was just exactly the right size. No trimming.
I glued up the heel block with the block of wood for the bolt-on bolt-off neck extension, then made a batch of heel blocks out of plywood.
I used my band saw and belt sander to follow the template and shape the heel block, then glued up the rims to the blocks.
Lastly, before I profile the sides I index off of the top and make a couple of parallel white lines I can use to realign the rims in the mold. Also while profiling I can make sure I am profiling the rims symmetrically.
Profiled rims ready for the next steps
✦
April 6th, 2016
I'm off to Japan for a couple of weeks so I'll leave the project for a bit. I did get the sides prepped — 30' top, upper bout flattened, and 15' back. I used reverse kerfed linings and made and glued on my side mass mounts.
The side mass mounts allow me to lower the top resonance some after the guitar is assembled. Adding mass to the sides in effect stiffens them to vibrations as seen by the top.
The mount for the side mass is just a bit of mahogany. I drilled them just deep enough to seat the brass insert, then notched out the linings to fit them in.
Side mass mounts notched and glued in — then off to Japan!
✦
May 2nd, 2016
After a couple of weeks touring around Japan, I've started to make progress again. With the rims completed I turned my attention to the back and the top. The back wood is really a bit too dense to have an active back, so I made it with four lateral braces.
Having built a series of jigs for my falcate guitars and fine tuning them, making and shaping the braces is going a bit smoother than in the past. First I joined, profiled and glued the center reinforcement strip to the back.
I jointed the top and installed the rosette. On the rosette I start with a router bit the same size as the purfling strip I use. I route a channel for the inside purfling strip and without changing the router I route the same cut into my wood rosette blank. I then do the same for the outside purfling line. I route out the waste between the two channels on the top. Now I have a ring routed perfectly for the ring and the purflings. I run the rosette wood blank upside down through my belt sander until the ring drops out — a ring the exact thickness for the channel I routed in the top.
I pulled out the table saw to rip the back braces and lamination strips for the falcate braces — made a large batch at once. I use a jig and a 27.5-degree router bit to make the back braces' gabled-house shape, then lay out and chisel the rebates.
I mark out the bottom 15' radius, plane them close, then use the LMI jig to finish the radius on the back braces. Then glue them on with the vacuum box.
Finally I ripped, fitted and epoxied the falcate braces to the top. Note the falcate braces are epoxied on top of a 3K 5.7oz carbon fiber tow, and the Teflon strips used to properly space the falcate braces between the bridge pin holes.
✦
May 5th, 2016
I'm close to finishing up the top. It took about 4 calendar days (not much time though) to get the top braced. I could do it quicker by epoxying all the braces at the same time — I just found I felt too hurried working within the epoxy's working time. On an earlier guitar I would bump a go-bar that would knock a brace over and goof up the CF. Now I'm a bit more relaxed. I do the falcate braces first, follow up with all the remaining braces except the transverse brace, then follow on with all the top carbon fiber.
After the epoxy cured on the transverse brace I shaped them to their final dimensions. I was deciding between 10 and 11mm based on load analysis — I ended up at about 10.6mm as the braces crossed the bridge pad. I took the secondary braces down to 8mm. The extra load of the 12 strings is really in the main falcate braces.
✦
May — Closing the Box
Sorry I've been slow to post — this really should be about four posts. I finished all the bracing and closed the box (of course forgetting to drill the hole for the truss rod in the transverse brace). I also started the neck and made a bridge that I'll use if I go with two holes per bridge pin.
I glued the top first (waiting for a K&K Pure pickup). Before gluing I checked the angle of the top under the fretboard extension to make sure I had the 2.5mm gap at the saddle I was looking for.
Before putting on the back I made an end wedge of Koa and installed it, and the K&K pickup arrived so I installed that as well.
I used a brand new bottle of Titebond hide glue to glue on the back.
Box closed — a major milestone in any build
I sliced up a bridge blank into 8mm and 3mm strips and laminated them back together with a sheet of CF weave. Then used the band saw and belt sander to profile the bridge, and modified my template to space the two strings per pin.
I also started making the neck.
✦
May 28th, 2016
I have the box closed and bound. I was struggling to decide between ebony and koa for my bindings. I was browsing Gurian Instruments' site and found ebony binding with a koa purfling strip. The amber koa line between the ebony and ziricote settled the question — I got both!
First I had to bend the ebony around the Venetian cutaway. I used the fox bender but unfortunately when taking the bindings out of the bender the spring steel exploded them into a bunch of pieces. I took out my freeform bending iron and was able to bend the ebony with no issue — bent very hot.
I successfully tried a new trick where I had a gap between the binding and the side — I clamped the top of the binding with a cam clamp, then used a heat gun to heat the binding and it slid down to close the gap. All in all it came out OK and I'm really excited about the Koa purfling.
Ebony binding with Koa purfling — the amber line against the Ziricote is stunning
✦
June 2nd, 2016
I like carving the neck but I tend to be nervous about the preparation. I need to take the big router to make the mortise. I switched to the table saw to make the tenon. I use a 3/8" bit and my router table to route the truss rod channel in the neck.
Before making the tenon I sliced the angle I thought the neck should have on the bottom of the neck blank and checked it was correct. This is my new way of making the bolt-on tenon using the table saw — I use a miter gauge to set the angle of the cheeks and tilt the blade at 5 degrees to make it easier to fit to the body. My new Grizzly tenoning jig allowed me to turn the neck back to front without changing a setting so for once I got a perfectly centered tenon.
Before drilling the pocket for the neck extension block I wanted the neck centered and at the correct angle, so I made the fretboard first. I use fretboard radius router bits from SJE Tools — they get me 95% there and I just clean up with a radius block. I sawed the fret slots and used a band saw and plane to taper the fretboard.
✦
June 3rd, 2016 — Headstock
To finish up the neck extension and fitting: I drilled pilot holes on the drill press, used those to guide matching holes in the neck block extension, then planed the extension flat to the neck. And yes — I remembered to drill the truss rod hole this time. With the pocket opened up almost to the brace I had no problem drilling the hole through the brace.
Not having plans for a 12-string, I drew out a headstock with sides offset by 5mm to provide an asymmetrical line — I've gotten tired of making them perfectly symmetrical. I glued on some wings to make the headstock wide enough, then used the headstock veneer itself as the template. I found some orphaned figured Koa sides I bought years ago — perfect for this long headstock.
✦
June 3rd, 2016 — Logo & Inlay
One last post before finishing. I added diamond fret markers, put a back veneer on the headstock, made my logo, and drilled for the tuners.
I had to cut my logo twice — I accidentally made a ukulele-sized logo first. I cut the moon from mother of pearl, and the hawk and branch from ebony fretboard cutoffs.
The leftover pearl hawks... still looking for a use for them!
✦
July 14th, 2016
I've been nervously waiting — but I can't rush the finish process. I used Zpoxy / EM6000 WB finish on the body and CA and Royal Lac on the neck. I'm just a couple of days from being able to sand and buff out the guitar.
✦
July 29th, 2016 — Completed!
It still needs a setup and final polishing, but here it is with strings. The top resonance came out lower than I thought at 175Hz, but the bridge rotation while not measured looks OK. The height of the two main falcate braces were at 10.5mm around the bridge — 3.5mm higher than my last SS that ended up at 170Hz. If it holds together it has a very loud and rich sound.
The new owner came by to pick it up. He really liked the guitar and played it for me and my wife for about an hour. It's fun to build a guitar for a real player.
Yesterday, I become the proud and happy owner of a beautiful hand crafted, custom made 12-string guitar by the talented John Parchem. I am so fortunate that John took on the challenge to build this fantastic guitar for me. Besides producing great sound, this guitar is an authentic piece of art that I will cherish forever! Without doubt, my most valuable piece in my guitar collection — Thank you very much John!! ... next time when I play Led Zeppelin's Over the Hills and Far Away it will "sort of" sound like when it was recorded.
.jpg)
.jpg)
.jpg)
.jpg)
.jpg)
.jpg)
.jpg)
.jpg)
.jpg)
.jpg)
.jpg)
.jpg)
.jpg)
.jpg)
.jpg)
.jpg)
.jpg)
.jpg)
.jpg)
.jpg)
.jpg)
.jpg)
.jpg)
.jpg)
.jpg)
.jpg)
.jpg)
.jpg)
.jpg)
.jpg)
.jpg)
.jpg)
.jpg)
.jpg)
.jpg)
.jpg)
.jpg)
.jpg)
.jpg)
.jpg)
.jpg)
.jpg)
.jpg)
.jpg)
.jpg)
.jpg)
.jpg)
.jpg)
.jpg)
.jpg)
.jpg)
.jpg)
.jpg)
.jpg)
.jpg)
.jpg)
.jpg)
.jpg)
.jpg)
.jpg)
.jpg)
.jpg)
.jpg)
.jpg)
.jpg)
.jpg)
.jpg)
.jpg)
.jpg)
.jpg)
.jpg)
.jpg)
.jpg)
.jpg)
.jpg)
.jpg)
.jpg)
.jpg)
.jpg)
.jpg)
.jpg)
.jpg)
.jpg)
.jpg)
.jpg)
.jpg)
.jpg)
.jpg)
.jpg)
.jpg)
.jpg)
.jpg)
.jpg)
.jpg)
.jpg)
.jpg)
.jpg)
.jpg)
.jpg)
.jpg)
.jpg)
.jpg)
.jpg)
.jpg)
.jpg)
.jpg)
.jpg)
.jpg)
.jpg)
.jpg)
.jpg)
.jpg)
.jpg)
.jpg)
.jpg)
.jpg)
.jpg)
.jpg)
.jpg)
.jpg)
.jpg)
.jpg)
.jpg)
.jpg)
.jpg)
.jpg)
.jpg)
.jpg)
.jpg)
.jpg)
.jpg)
.jpg)
.jpg)
.jpg)
.jpg)
.jpg)
.jpg)
.jpg)
.jpg)
.jpg)
.jpg)
.jpg)
.jpg)
.jpg)
.jpg)
.jpg)
.jpg)
.jpg)
.jpg)
.jpg)
.jpg)
.jpg)
.jpg)
.jpg)
.jpg)
.jpg)
.jpg)
.jpg)
.jpg)
.jpg)
.jpg)
.jpg)
.jpg)
.jpg)
.jpg)
.jpg)
.jpg)
.jpg)
.jpg)
.jpg)
.jpg)
.jpg)
.jpg)
.jpg)
.jpg)
.jpg)
.jpg)
.jpg)
.jpg)
.jpg)
.jpg)
.jpg)
.jpg)
.jpg)

.jpg)
.jpg)
.jpg)
.jpg)
.jpg)
.jpg)
.jpg)
.jpg)