Tasmanian Blackwood / Lutz Spruce Gore Falcate Build
StyleMedium Body · Venetian Cutaway
TopLutz Spruce
Back & SidesTasmanian Blackwood
BracingFalcate — Gore / Gilet · First Build
NeckBolt-On / Bolt-Off
BridgeEbonized Walnut · CF Laminate
FinishTarget EM6000 Water-Base Lacquer
Build PeriodMarch – July 2014
March 14th, 2014 — The First Gore Build
This guitar was my first attempt at building to Trevor Gore and Gerard Gilet's Contemporary Acoustic Guitar Design and Build — following their procedures as closely as possible, including falcate bracing, a bolt-on/bolt-off neck joint, an active back, and acoustic measurement throughout. Coming off my previous dreadnought, I had three projects lined up. The Gore build was the one I kept coming back to.
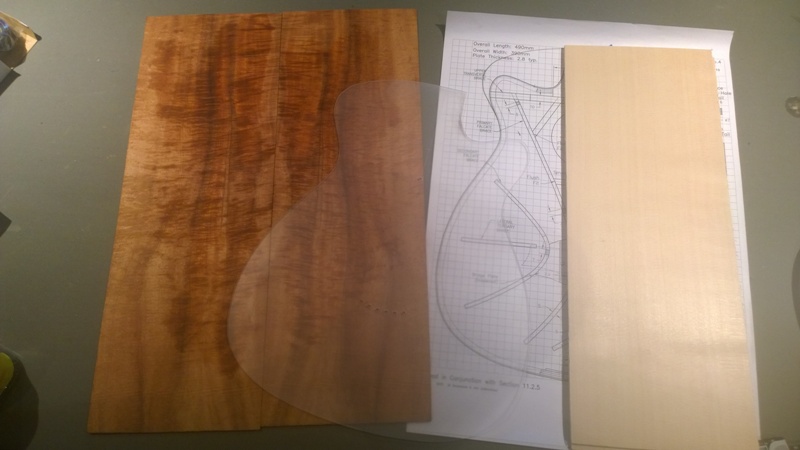
The wood choices felt right: a Tasmanian Blackwood set from Australian Tonewoods, with a Lutz Spruce top from High Mountain Tonewood. Both are species with good acoustic credentials, and the Blackwood in particular has a character all its own — somewhere between mahogany warmth and rosewood clarity.
The Gore / Gilet SystemThe falcate bracing pattern places the bridge at the structural centre of the top — the primary braces radiate symmetrically from the bridge in the lower bout. Unlike X-bracing, there is no cross-brace across the lower bout; the bridge itself provides the cross-grain stiffness, which is why a carbon-fibre reinforced bridge and bridge plate are part of the system. The bolt-on/bolt-off neck uses a mortise and tenon with two machine bolts — the neck can be removed entirely without tools damage, making future adjustments and fret work straightforward.
✦
March 18th, 2014 — Wood Selection & Tap Testing
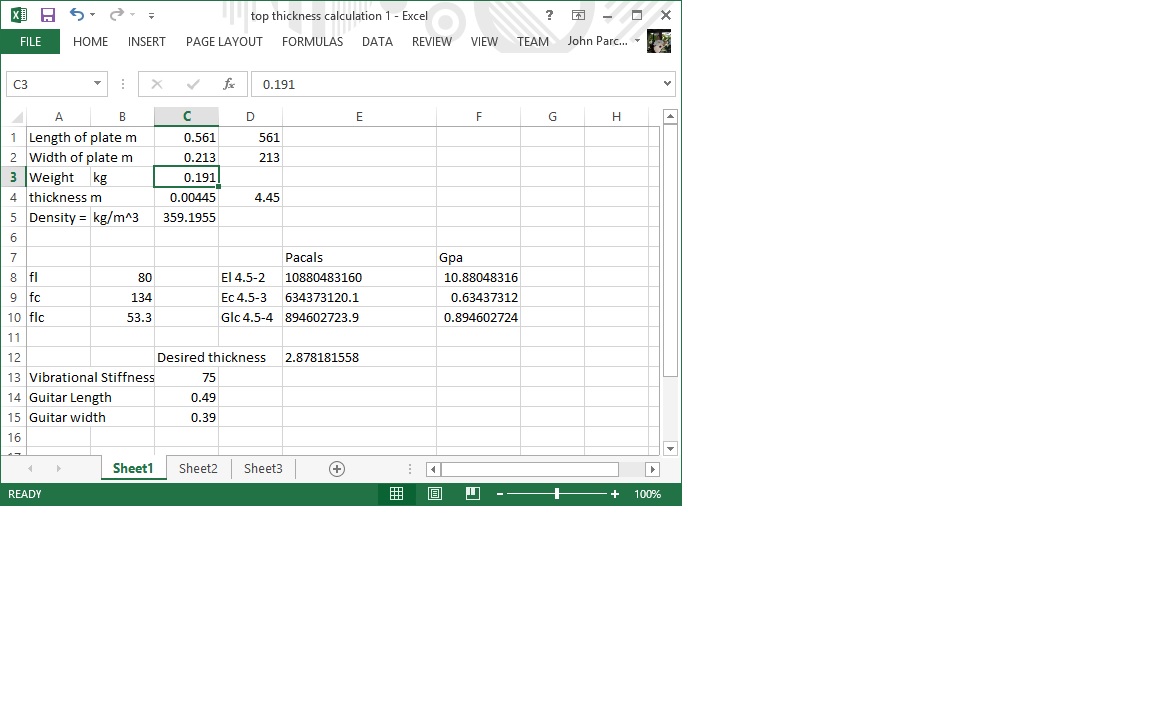
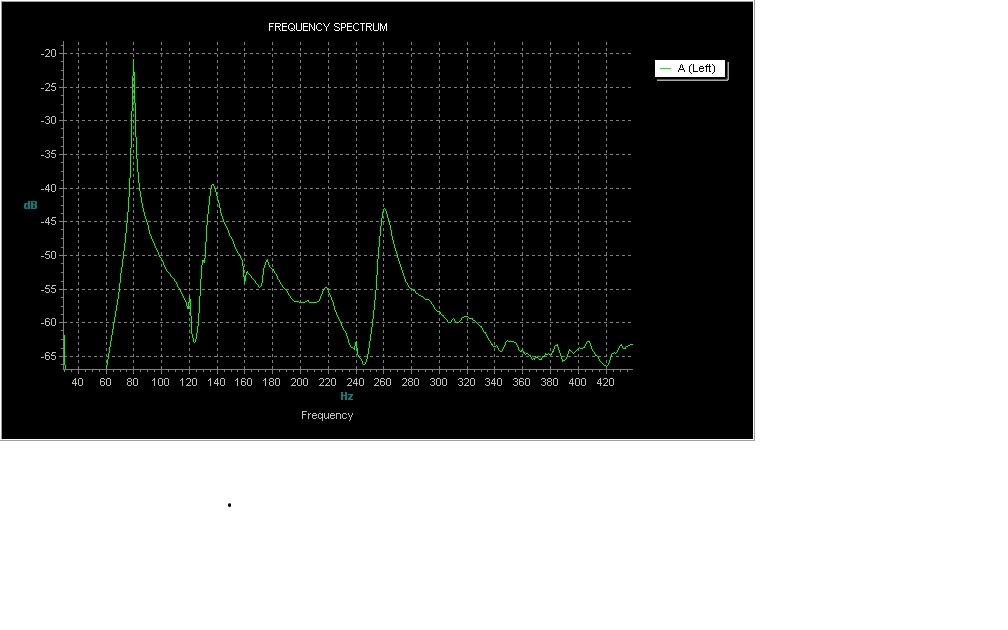
Gore's process starts with measuring the plates before a saw touches them. Section 6.2 of the build book covers tap testing to establish target thickness based on measured stiffness rather than a rule-of-thumb number. The vibration frequency of a plate is proportional to Young's modulus — the stiffness measurement. Three tap measurements are needed: long-grain, cross-grain, and a corner-to-corner twisting vibration. Holding and tapping the plates in specific locations emphasises each mode.
Tap Testing Method — Gore / Gilet §6.2Each plate must be rectangular and smooth for an accurate reading. The three modes measured are: fl (long-grain), fc (cross-grain), and flc (torsional/twist). Combined with the plate dimensions and density, these give the stiffness values needed to calculate target thickness. The goal is to match stiffness across guitars, not to hit an arbitrary thickness.
After some help from the Australian/New Zealand Luthiers Forum I found a small error in my diagonal stiffness equation — it had effectively removed the torsional measurement from the calculation, giving a slightly thicker target. With the correction: top target 2.7mm, back target 2.5mm (wanting an active back). Nearly a 10% difference on the back.
✦
March 22nd, 2014 — Jigs, Molds & Bending Forms
Building to a new plan means building a complete set of templates, molds, and bending forms from scratch — not my favourite part of any project. The copying shop came into its own: printed the plans, cut them up, glued them to plywood or Plexiglas, and worked through them on the bandsaw and sanders. I also added a cutaway form to my Fox-style bender for the Venetian cutaway.
3-Metre Radius DishThe Gore plan calls for a 3-metre (approximately 10-foot) back radius — far larger than the typical 15' or 25' radius dishes used in conventional builds. The idea is almost imperceptible dome on the back, acting more as a structural arch. I considered routing one using a 3-metre length of steel guide wire as a compass arm attached to the router motor, but ultimately had one made. I also have a 32' dish; at this radius the difference between 10' and 32' is negligible to play in, but the plan is the plan.
✦
March 22nd, 2014 — Falcate Brace Strips
The falcate braces are laminated from three bent spruce strips, epoxied together in a mold to hold their curve permanently. Before cutting the full set I tested the process: bent a 1.7mm strip of scrap spruce to check it could handle the tighter of the two falcate curves. No problem. Cut and thicknessed a batch of wider strips, sprayed them with Supersoft II, and bent them on the iron.
For the actual lamination: used the cut-out material from the body mold as a brace mold and a strap clamp to pull the three strips together — a technique straight from the build book. Waxed the mold and strap with paste wax and used wax paper during the System 3 structural epoxy lamination. The result: a perfectly shaped brace with no spring-back.
✦
March 31st, 2014 — Neck Blank & Scarf Joint
This was my first scarf-jointed neck blank — I'd always cut necks from a single piece and been nervous about the joint, mostly because I couldn't cut a reliable straight line on the bandsaw. The miter guide my kids got me solved that: I cut a 45° wedge in plywood to set and hold the scarf angle, and the joint came out clean enough to need only minimal cleanup with a plane.
Bone-Headed MomentSet up the router table very carefully for the truss rod slot — centred up the neck blank and everything was ready. Then started the cut before tightening the fence. The resulting slot was off. Cut a strip of mahogany, planed it to fit, and wicked in some CA. Reset the fence and cut the correct slot. Nobody will see the repair unless they're pulling the fretboard off for a refret someday.
✦
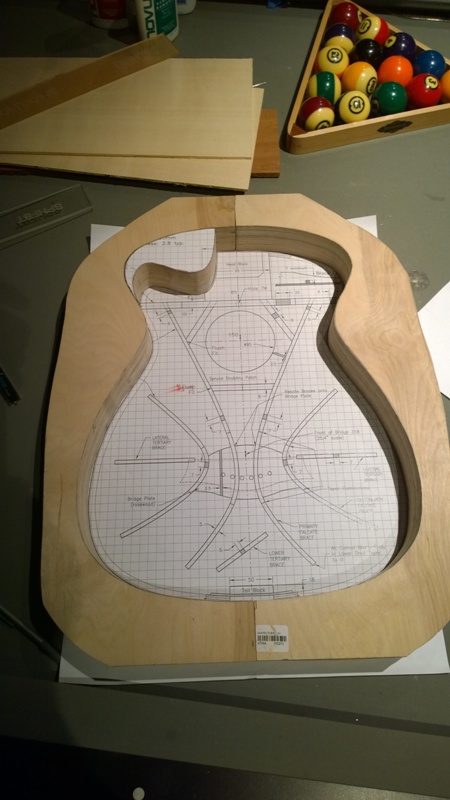
March 31st, 2014 — Rosette & Top Preparation
Installed an extra amboyna rosette I had made as an option for a previous guitar — a nice reuse of something that had been sitting waiting for the right instrument. Used the template to drill the peg holes and mark the rosette centre early in the process, because on a falcate-braced guitar the primary braces pass between the bridge pin holes. Everything has to be located before bracing begins.
Top prepared — peg holes drilled, rosette installed, mylar cover ready. The primary falcate brace must pass between the two pin holes visible here.
✦
April 2nd, 2014 — Primary Falcate Brace Glue-Up
Everything staged on the bench before touching the epoxy — brushed epoxy onto the top along the brace paths and the bridge plate area, applied epoxy to the CF strips and laid them down first, then set the bridge plate over the CF fabric, inserted the index pins through the fabric, and followed with the two primary braces. Go-bars on everything simultaneously.
Carbon Fiber Under the BracesIndividual fibres (tows) from a woven CF fabric are placed under each brace before gluing down. The combination of epoxy and CF tow creates an I-beam effect — CF on the bottom of the brace, wood brace standing proud, CF tape on top to follow later. The CF under the bridge plate is a full sheet of woven fabric, creating the stiff cross-grain member the falcate system relies on instead of a conventional cross-brace.
Primary falcate braces and bridge plate in the go-bar deck — epoxy curing overnight
✦
April 6th, 2014 — Secondary Braces & Carbon Fiber
After the primary brace epoxy cured, cut and installed the secondary falcate braces and sound-hole braces. These inlet into the upper transverse brace — the UTB itself waits until all other braces are down. Traced all brace locations so I'd know where to place CF tows on the second pass, then went back to the go-bar deck for the next epoxy session.
Once cured, carved the braces down: falcates to approximately 7mm around the bridge, tapering to about 5mm near the upper transverse brace, and tapering to zero at the tail end. Noticed I had two side braces at 7mm wide instead of the specified 5mm — a sharp chisel sorted that quickly. Also noticed I had forgotten the lower tertiary brace, which would go in during the CF session.
CF on all carved braces — the forgotten tertiary brace being glued in simultaneously
✦
April 7th, 2014 — Upper Transverse Brace
The upper transverse brace has a complex profile: dished across its length with a flattened section in the fretboard extension area, about 1.4mm of dish across 400mm. This profile also helps set the neck angle — the brace knocks in a bit of the required tilt. Made a caul from a piece of scrap using a cabinet scraper to dish it to match, planed the profile into the brace face, then installed CF under the brace before epoxying it down.
Completed top bracing. All braces profiled, CF tows on bottom and top of every brace.
✦
April 12th, 2014 — Side Bending
Waited for the 10' radius dish to arrive before bending the sides, as I wanted to use it to make accurate side-profile templates. Put a strip of poster board into the mold on top of the radius dish and traced the curve, then measured up the correct body depth and drew the top line. These templates guided the side profiling both before and after bending.
Thicknessed both sides to 2.2mm on the drum sander; thinned the cutaway side above the waist to 1.9mm to help it around the tight Venetian curve. Checked the orientation of each side ten times — I once ended up with a set of sides for a left-handed harp ukulele and had no desire to repeat that.
✦
April 16th, 2014 — Neck Block & Tail Block
The neck block for the bolt-on/bolt-off joint is a two-part assembly — a standard-sized neck block with a larger mahogany extension block glued on. The extension will ultimately be routed to accept the neck tenon. The block also needs to be profiled to match the Venetian cutaway side profile. Made a template of the block face, transferred the profile, rough cut on the bandsaw, and cleaned up in a drum sander chucked in the drill press. The tail block is birch plywood with the ends sanded to the lining width on the Luthier's Friend.
✦
April 19th, 2014 — Laminated Linings & Rim Profiling
Rather than conventional kerfed linings, the Gore build uses solid laminated linings — three thin strips bent together and glued simultaneously to the rim. Used fish glue for the long open time; the cutaway side especially needed time to get everything clamped and the linings sitting level before the glue started to grab. The resulting rims are noticeably stiffer than a guitar with kerfed linings — you can feel the difference.
Also installed kerfed linings on the back side, side reinforcement splints, and the mass support blocks — mahogany blocks with brass inserts that allow small masses to be added or removed to tune the side resonances. More mass lowers the top resonance without much effect on other modes.
✦
May 5th, 2014 — Back Bracing
The live/active back plan has a set of radial braces in the lower bout in addition to the conventional ladder pattern — laid out with a 30° square. All back braces have a house-shaped (gabled) profile rather than rectangular. The book describes using a 22.5° router bit to shape the stock, but I found the process a bit sketchy; used a chisel and small plane instead.
Couldn't use the 10' radius dish to radius the back braces — too easy to roll over the edges. Instead used the radius board to mark the curve with a pencil, planed to the line, and finished on the concave side of the radius board. Glued them in one at a time with cam clamps.
✦
May 11th, 2014 — Closing the Box
The carbon fiber on the top held the top in exactly the right shape — no spring-back at all. There was even a slight vacuum when putting the top onto the radius board it was glued up in. A straight-edge check on the fretboard extension area showed exactly 2.5mm at the saddle position.
Fitted the top to the rims and found I'd put in slightly more longitudinal radius than intended — the top needed to be pushed down about 1mm at the blocks. Corrected by carefully working the middle of the rims with a combination of a block plane and the radius board until the top sat with no pressure needed. The correct body angle was maintained throughout.
✦
May 21st, 2014 — Binding & End Wedge
Binding, headstock veneer, and end wedge are all cocobolo, with thin BWB purfling matching the rosette. The tight Venetian cutaway is my least favourite thing to bind — sprayed the bindings with Supersoft and waited a day before bending. The Supersoft really helped; used fish glue for the long open time it gives, which let me get the entire top binding taped before the back bindings went on.
✦
May 31st, 2014 — Neck: Headstock & Bolt-On Extension
The Gore headstock uses a straight-string layout — tuner posts are positioned so each string runs straight from nut to post with no lateral break angle. This affects how the strings feel under the fingers: no break at the nut means a longer effective string in terms of bend resistance and fretting feel. Laid out string spacing using the Gore method, extended the string lines into the headstock, and placed each post centre 3mm off the string line.
The bolt-on extension is the heart of the neck joint: a mahogany plug that fits into a routed cavity in the heel block, with two brass inserts accepting machine bolts from inside the body. The fretboard extension sits over the plug and is also supported — nearly the entire fretboard is backed by wood. Glued the headstock veneer (cocobolo) and laminated stack with LMI white glue rather than epoxy, which worked well and didn't warp the stack.
✦
June 6th, 2014 — Fretboard & Neck Carving
Cut the mortise with the Luthier Tool jig, made the fretboard, radiused it — rough pass with a plane then finished with a sanding bar and guide to prevent skewing. Bound with ebony using CA. The bolt-on/bolt-off system pays dividends at fretting time: the neck comes off the guitar completely, and fret dressing is done off the instrument — far more comfortable than working over the body.
Also cut and installed my hawk and moon logo inlay in the headstock — best execution yet. Actually made the inlay round so it drops cleanly into a drilled 1" hole.
✦
June 24th, 2014 — Ebonized Walnut Bridge
On a falcate-braced guitar the bridge is the only cross-brace in the lower bout — it has to be stiff in the cross-grain direction, which is why a carbon-fibre laminate runs through it. But it can also be lighter than a conventional rosewood or ebony bridge, since it doesn't need the same mass. A walnut bridge with CF laminate comes in at around 22 grams versus 35 grams for an equivalent ebony bridge.
Ebonizing WalnutEbonizing uses a chemical reaction between the tannins in the wood and iron oxide in a vinegar / steel wool solution. Walnut has sufficient tannins to react without any pre-treatment. Made two batches — one with fresh clean steel wool in white wine vinegar, one with pre-rusted steel wool. Brushed on, the walnut darkened almost instantly. After several coats the colour is a close match for ebony — the bridge in the photo weighs 22 grams against 35 grams for the ebony bridge beside it.
✦
June 27th, 2014 — Finishing
Pore filled with Z-poxy, then sprayed Target EM6000 water-base lacquer. Sprayed 3-mill wet coats measured with a mil gauge — at this thickness the EM6000 levels beautifully with no drips or sags. Plan: 8 coats on back and sides, level sand, drop-fill any voids, 6 more coats, light nub removal, then 2 final coats for a total of 16 on back/sides and 8 on top. The neck got French polished — no particular reason other than it seemed like fun.
✦
July 7th, 2014 — Final Assembly & Setup
After waiting five days for the finish to cure, level sanded the top and checked bridge alignment one last time. Removed finish from the bridge footprint using a scalpel trace, razor blade, and sharp chisel — spraying without masking and scribing a clean line produces a better result than tape. Glued the bridge with a vacuum clamp.
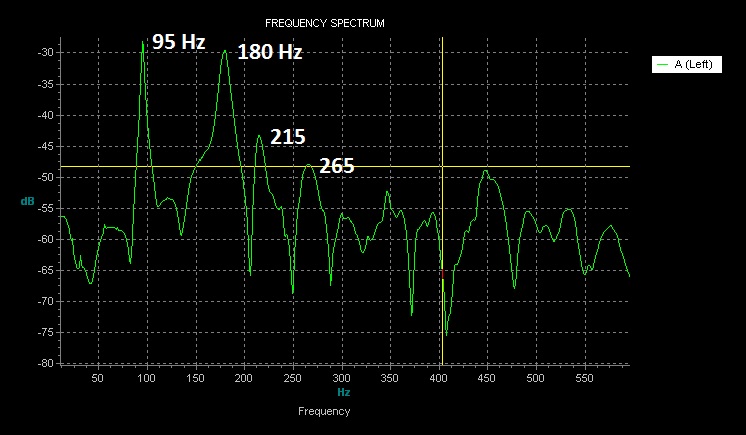
Final tap testing before assembly: targets were 95Hz (air), 180Hz (top), and 226Hz (back). The back came in 3 semitones from the top rather than the target 4 — I'd gone slightly deeper on one back brace scallop than the plan suggested. Worth noting for future builds. With all resonances between scale notes the guitar should be tonally well-behaved.

.jpg)
.jpg)
.jpg)
.jpg)
.jpg)
.jpg)
.jpg)
.jpg)
.jpg)
.jpg)
.jpg)
.jpg)
.jpg)
.jpg)
.jpg)
.jpg)
.jpg)
.jpg)
.jpg)
.jpg)
.jpg)
.jpg)
.jpg)
.jpg)
.jpg)
.jpg)
.jpg)
.jpg)
.jpg)
.jpg)
.jpg)
.jpg)
.jpg)
.jpg)
.jpg)
.jpg)
.jpg)
.jpg)
.jpg)
.jpg)
.jpg)
.jpg)
.jpg)
.jpg)
.jpg)
.jpg)
.jpg)
.jpg)
.jpg)
.jpg)
.jpg)
.jpg)
.jpg)
.jpg)
.jpg)
.jpg)
.jpg)
.jpg)
.jpg)
.jpg)
.jpg)
.jpg)
.jpg)
.jpg)
.jpg)
.jpg)
.jpg)
.jpg)
.jpg)
.jpg)
.jpg)
.jpg)
.jpg)
.jpg)
.jpg)
.jpg)
.jpg)
.jpg)
.jpg)
.jpg)
.jpg)
.jpg)
.jpg)
.jpg)
.jpg)
.jpg)
.jpg)
.jpg)
.jpg)
.jpg)
.jpg)
.jpg)
.jpg)
.jpg)
.jpg)
.jpg)
.jpg)
.jpg)
.jpg)
.jpg)
.jpg)
.jpg)
.jpg)
.jpg)
.jpg)
.jpg)
.jpg)
.jpg)
.jpg)
.jpg)
.jpg)
.jpg)
.jpg)
.jpg)
.jpg)
.jpg)
.jpg)
.jpg)
.jpg)
.jpg)
.jpg)
.jpg)
.jpg)
.jpg)
.jpg)
.jpg)
.jpg)
.jpg)
.jpg)
.jpg)
.jpg)
.jpg)
.jpg)
.jpg)
.jpg)
.jpg)
.jpg)
.jpg)
.jpg)