Just starting my first possible commission — an East Indian Rosewood and Sitka Spruce Martin-style D28. I've worked with my potential customer to nail down the wood selection. This one will not have a bevel or cutaway; it will be a more straightforward guitar. The plan: curly maple bindings, herringbone purfling on the top, a zippered back strip. The rosette will harken to Martin with a ring design — the outer rings will be a BWBBWB pattern, the inner ring a thin claro walnut ring with black purflings inside and out. Brazilian Rosewood for the fretboard, headstock veneer, and bridge.
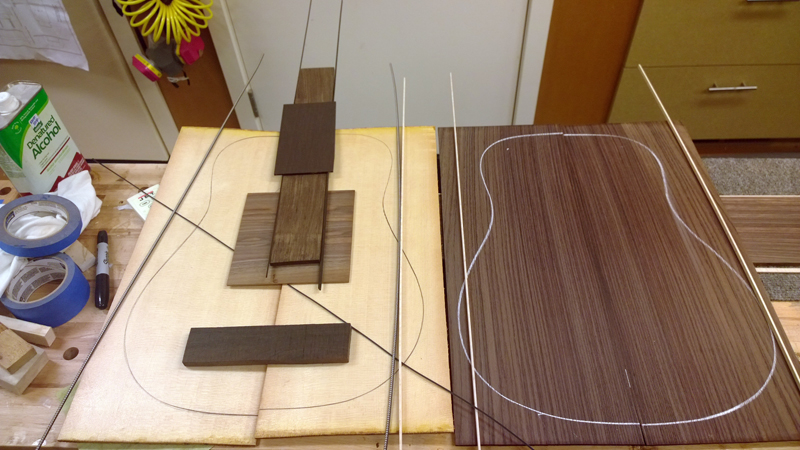
Wood selection laid out — East Indian Rosewood back and sides, Sitka Spruce top
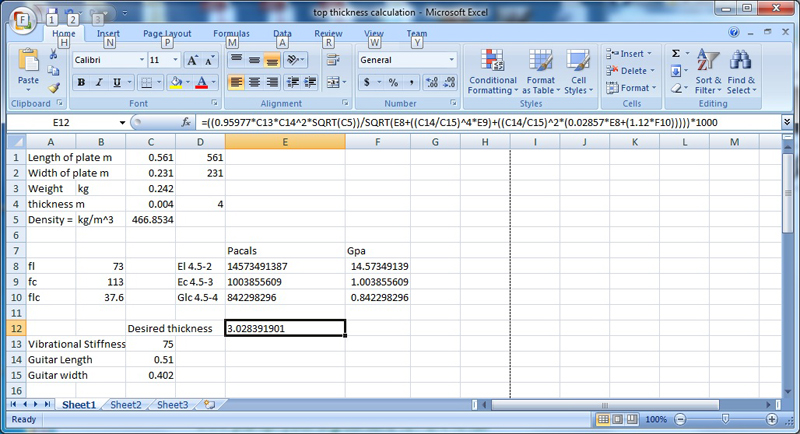
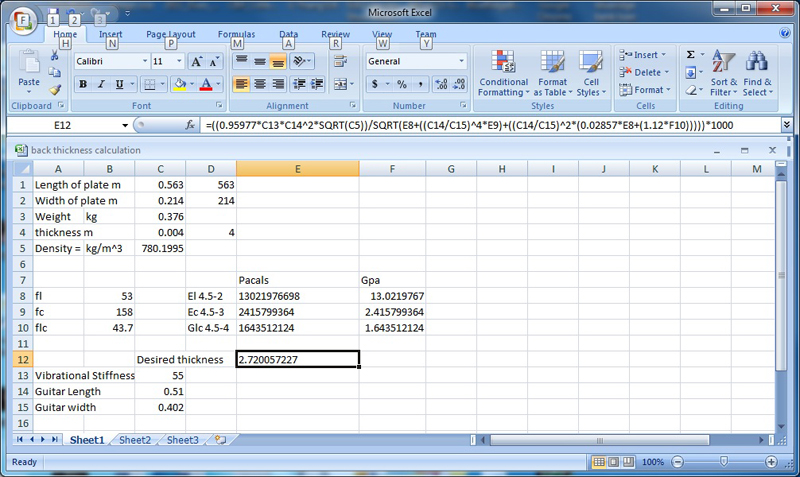
Gore / Gilet Tap Testing MethodThis is the third guitar I've documented wood characteristics and let those measurements influence the build. I measure height, width, thickness, and weight of each plate to calculate density, then use Visual Analyzer to record long-grain, cross-grain, and diagonal tap frequencies by holding plates at their vibrational nodes. These measurements feed into a spreadsheet from the Gore/Gilet Contemporary Acoustic Guitar Design book to calculate a deterministic target final thickness for both top and back — a methodical, repeatable form of tap tuning. Higher target stiffness gives a thicker plate; lower gives thinner. I started with their numbers and will deviate as I develop my own sound preferences.
Both plates were taken to 4mm first — enough to sand past the saw cuts and get even, clean surfaces. The long-grain frequency graph below shows the first peak at 73 Hz (long grain) with a secondary peak around 113 Hz (cross grain). Separate holds/taps confirmed each mode independently. The resulting target thicknesses: 3mm for the Sitka top, 2.7mm for the EIR back.
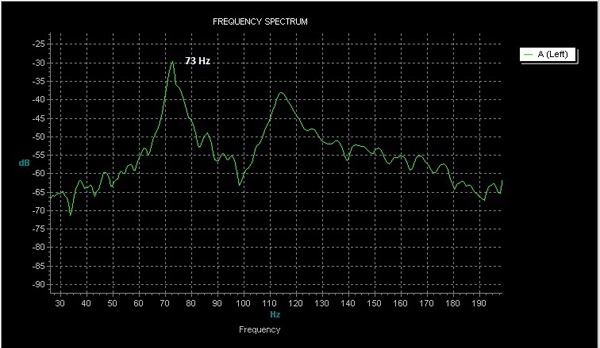
Sitka top long-grain tap tone — 73 Hz long grain, 113 Hz cross grain visible
Made a bit more progress. Both kids are back off to college so it's quiet in the house. After all that highly figured wood on recent guitars, the East Indian Rosewood is a pleasure to bend — cycle the heat twice on each side and the sides come out with virtually no spring back. They just dropped into the mold. I glued on the end blocks. I have a long-scale neck with a heel block that's been sitting in the shop for a while, so I'm going to use it for this guitar. The tail block is cut from 1/4" birch plywood.
I profiled the top and back rims (28' for the top, 15' for the back) with sanding dishes both before and after kerfed linings. I have better clamps now — on the last guitar I was futzing with small wimpy ones trying to get the linings down, so I upgraded to bigger clamps and they clamped right down. I also had some Koa strips trimmed off the sides of a previous project, so I used those to reinforce the sides. For the back plates, I was able to get a clean joint on the shooting board with a plane alone — no sandpaper needed. The EIR is so beautifully book-matched I'm considering leaving out the zipper strip. I'll route a rebate if I change my mind later.
Put in the rosette this morning. For the outer rings I jammed two BWB purfling strips into each routed slot to create a BWBBWB pattern. Then I routed a rebate for a claro walnut ring framed with black fiber strips on each side. The goal was to suggest a Martin rosette but using a wood ring design more in my own style.
January 9th, 2014 — Brace Stock & Back Strip
I ordered some tops from Mario at Sprucetonewood and he sent along a split piece of Lutz sapwood bracewood. I sliced it up into braces — he would have had me split them for no run-out — and they feel pretty good, so I'm going to use them on this guitar.
I inlaid the zipper back strip — decided to include it after all. Also: I saw a post with a picture from the Martin factory where they were cutting up a reject top to make back reinforcement strips, and I thought — I have a top I goofed up. So now I have a good supply of master-grade back strips. I glue them on close to the correct thickness and then sand them down with a sanding block curved to match my drum sander radius.
January 9th, 2014 — X-Brace & Top Bracing
I bought a bunch of poster boards at $1.50 each to make protective covers for the top. The top is sanded to 120 and very close to final thickness. Before taping on the cover, I clamped the top to the rims and checked the neck angle by rolling a 2.5mm drill bit from the neck plane to the saddle location — that's the height I want to start with.
I drew the bracing patterns on both top and back, taped off the sound hole to keep wood bits from being pressed into the top surface. I put a 28' radius on the bottom of the X-brace blanks, then copied the scarf angle to my braces. Important note: make sure one brace is face-up and one is face-down when cutting the pair at the same time — even today I almost forgot and only caught it before cutting. The X joint came out tight and at the correct angle.
.jpg)
Top bracing complete — Lutz sapwood X-brace, tap tuned finger and diagonal braces
Bridge Plate Sequence NoteI put in the X-braces before the bridge plate this time — I normally do it in reverse order and glue the bridge plate on a flat surface. No big deal, but I had to use the massive fiberglass slats (instead of the safer fiberglass gobar rods) to force the un-radiused caul down into the radius dish. I did some tap tuning on the finger and diagonal braces afterward — taking wood off until the top felt alive. Happy with where it landed.
January 9th, 2014 — Back Bracing
Building a non-live back on this guitar — four full-height braces shaped with a plane to a near-triangular profile. I put a 15' radius on all back braces using a combination of a plane to rough in the radius and the sanding dish to finish. I took special care to work from a reliable straight edge and square for all scalpel cuts into the back strip for the brace notches. The scalpel with a new blade is so sharp it cuts cleanly without a saw, and the braces pushed in square.
January 9th, 2014 — Fitting Plates to Rims
Fit the top and back to the rims. I've been trying to assure tight fits from the start — carefully centering and marking where each brace intersects the rims, making sure I have clear sight lines and access before marking. Even though the brace tails are all close in height, I individually set the die grinder depth for each brace before routing its rebate into the kerfed linings. Everything went well for both plates. With the top properly fitted I re-checked the neck angle one more time — the 2.5mm drill bit rolled right up tight at the saddle location.
January 18th, 2014 — End Wedge & Bindings Bent
I used a bit of figured maple for the end wedge — a simple wedge without a black purfling strip. I decided a clean channel with a plain maple wedge would look fine. The key to a clean cut: scalpel with a new blade instead of a razor saw. It takes a few passes to establish the line but then follows cleanly. I've had slips and widened cuts with a saw on previous instruments. Chiseled the waste, clamped it down, and it came out right.
.jpg)
Curly maple bindings and herringbone purfling bent — Fox-style bending machine, no problems with either
.jpg)
Heel block flattened with a plane — complements the flat spot under the transverse brace for clean fretboard gluing surface
January 18th, 2014 — Closing the Box
Glued the back on first — I always want the back looking nice since it's what people see through the sound hole. Used a flush-cut bit to trim the waste. Then glued on the top.
.jpg)
Box closed. Sides completely leveled with inflatable drum sander before routing binding channels.
I completely leveled the sides before routing the binding channels, using a hand-held drum sander with an inflatable bed. I promised myself this on my last build after the stress of thin binding over unlevel sides. I did cut part of one herringbone channel slightly too deep on one side — caught it before going too far. I glued a spare binding strip into the over-deep channel, leveled it, and re-routed at the correct depth. It's all inside and structural. I bent two extra strips for exactly this kind of situation.
.jpg)
New rubber strip clamping method — first time ever with no gaps to plates or rims on any binding
January 18th, 2014 — Back Bindings & Neck Mortise
The rest of the binding went well with no mishaps. On the back I added a BW purfling to the binding — the maple purfling matches the center strip, and the black fiber frames the contrast with the bindings nicely. For the first time ever with the rubber strip method I had no gaps to plates or rims. I used LMI instrument glue so I only did one strip at a time — the open time is limited. Next time I'll use fish glue and bind both top or back strips together at once.
I'm using a couple-year-old LMI neck with a matching heel block. I drilled a couple of holes and used a flush-cut bit to open the mortise. The neck centered nicely and needed only a little adjustment to reach the correct angle.
January 25th, 2014 — Headstock, Fretboard & Bridge
Glued on the Brazilian Rosewood headstock veneer, slotted the fretboard, and carved the bridge. For the headstock: rough-cut the profile on the bandsaw, sanded the nut edge to the correct angle, carefully placed and glued on the veneer. In the past I would template-rout the final profile, but I've ruined multiple necks when that went wrong — now I just shape by hand with a plane and a rasp.
.jpg)
Headstock shaped by hand only — after ruining multiple necks with the template router bit, it's planes and rasps from now on
I used LMI's fretting jig and templates, then the long Stewmac 16" radius bar to radius the slotted fretboard, planing a rough radius on first to make it easier. The BRW is much easier to cut than the ebony I've worked with before. The 16" radius matched to the body — I noticed the store-bought bridge I was copying had a 12" radius, so I matched my bridge to my own fretboard instead.
This is the first steel-string bridge I've carved. I copied a Martin-style bridge as closely as I could — rough cut on a BRW blank, then most of the profiling on the Luthier's Friend sanding station on the drill press, using the drum as both a spindle sander for shape and a drum sander for the wings. I put the 16" radius on the bridge saddle platform to match the fretboard.
January 26th, 2014 — Fretboard Glued On
With the neck bolt inserts in and the fretboard glued on, I'm ready to start finish prep. Still a bit of fussing on the neck and tuner holes to drill, but the body can start being prepped.
February 3rd, 2014 — Finish Prep & Logo
Slowly preparing the guitar for finishing. Main concern is keeping the curly maple bindings clean while preparing the rosewood. I scraped the entire back and sides and sealed the binding, purfling, and back center strip with shellac. Rounded the binding edges and reapplied shellac. For pore filling I plan to carefully pad on alcohol-thinned Z-Poxy as a seal coat first — thin enough that I don't need to sand it off before normal pore-filling coats — to avoid spreading rosewood-stained shellac everywhere. It mimics what I do when French polishing with shellac.
I made and installed two versions of the hawk-in-moon logo. The first — MOP moon with an ebony hawk — installed fine but had a hairline crack in the pearl going straight up from the hawk's head. I also wanted to try a Black African Rosewood hawk instead of ebony, to better match the Brazilian Rosewood headstock veneer. The second version is very dark under finish but a nice match.
February 9th, 2014 — Fretboard Inlays
Guitar is in the finish room waiting for the second epoxy coat to cure. Meanwhile I inlaid diamond-shaped MOP position markers. I normally glue the pearl down with a dab of white glue, let it secure for ten minutes, then trace around it. This time I traced with the scalpel and filled the scalpel line with chalk to make it visible. About halfway through routing the diamond outlines — switching between a fine end mill for corners and a larger one for bulk clearing — I looked at the clean scalpel cuts and decided to just deepen them a bit more and clear the waste with a chisel. Much happier with the fit, and nearly as fast.
February 14th, 2014 — Pore Filled & Ready to Spray
Fully pore filled and prepped — ready for spraying.
.jpg)
Fully prepped — Z-Poxy pore fill, shellac seal coat, ready for EM6000
February 20th, 2014 — Spraying
Body sprayed. After the first day I found a small but noticeable area I'd left without Z-Poxy — a sand-through, lighter than the surrounding wood. I scraped all the finish off that area and re-sprayed. Looks good now. Back and sides received 16 coats total — leveling at 4, leveling and drop-filling at 8 and 12, finished with 4 coats, all sprayed as close to 3–4 mils wet as I could manage. Top received 10 coats — leveling at 4, leveling and drop-filling at 8, finished with 2 coats.
Waiting for the finish to cure is the hardest part of any project. I need to wait until Wednesday before buffing the body, Thursday for the neck. While waiting I bolted on the neck to verify the angle was still good, and set the bridge and pickguard on top for a preview.
February 26th, 2014 — Fretting & Waiting
I've waited long enough — sanding and buffing starts tomorrow. While waiting I fretted the neck, added the position markers, and roughed out a nut. Once buffed I still need to place the bridge. I'm waiting until the end on this guitar and will slot the saddle while the bridge is on the guitar — I've filled and re-slotted a bridge on an older guitar that needed a neck reset, so I'm comfortable with it.
February 27th, 2014 — All Buffed Out
All buffed out. Ready to start on the bridge.
March 12th, 2014 — Bridge Placement & Saddle Slot
Every guitar I change when and how I deal with the bridge and finishing process. This time I sprayed the body without masking the bridge footprint, then glued the bridge on without a pre-cut saddle slot. Placing the bridge on a fully finished top gives a clean continuous finish across the whole bridge area — no tape edge ridges, no second tracing pass.
New Bridge Placement MethodI placed the bridge, used bolts through the E string holes for alignment, and traced from the corners in with a scalpel and a brand new blade. Cleanest results I've had. The center-finder jig assured the bridge was centered to the neck — the tool's back edge rests against the nut. I drilled the E string holes with a 3/8" brad point bit, then traced and cleared all the finish with chisels, straight-edge razor blades, and light sanding. Ken's bridge clamp for gluing — easier than the vacuum clamp, better placement assurance, and easy squeeze-out cleanup.
For the saddle slot I used the Stewmac jig — the same jig I used to re-slot a bridge on an older D28 during a neck reset. The idea: get everything together including the bridge, then route the slot right where I want it. The operation went as smooth as it could.
For the nut slots I rough cut and file them a little high so I can work them with the guitar strung up. I want the slots to go almost to the zero-fret position — I use a scraper blade as a depth stop. When the saw or file hits the scraper, I stop.
Final spectrum analysis with bridge, saddle, and pins. Target was 95 Hz for the air resonance and 170 Hz for the top. I'm close — not right on a note frequency but not on one either, so I'm leaving it. The near-miss on the targets may be making this D28 lean more toward fingerstyle. But it sounds good. Also of note: nearly a 2 Hz drop in top frequency from no pins to with pins — shows how sensitive the top is to weight.
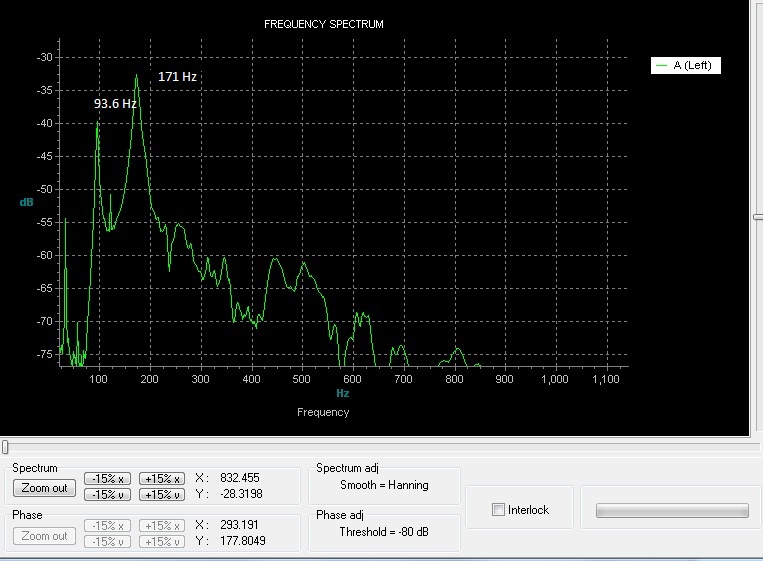
Final FRC — bridge, saddle and pins installed. Air ~95 Hz, top ~170 Hz. Nearly 2 Hz drop with pins vs without.
March 14th, 2014 — Completed & Delivered
East Indian Rosewood back and sides, Sitka Spruce top, Curly Maple bindings, Claro Walnut rosette ring, Brazilian Rosewood fretboard, headstock veneer, and bridge. Finish: Z-Poxy pore fill on back, sides, rosette ring, and headstock veneer; shellac wash coat on entire guitar except bridge; EM6000 sprayed finish.
Thanks for following the blog!
D28 Commission — Guitar #13
StyleMartin D-size
TopSitka Spruce — target 3.0mm (Gore/Gilet method)
Back & SidesEast Indian Rosewood — target 2.7mm
BracingX-brace — Lutz sapwood from Mario / Sprucetonewood
Top Radius28'
Back Radius15' — non-live back, four full-height braces
Side ReinforcementKoa strips (offcuts from previous build)
BindingsCurly Maple
Top PurflingHerringbone
Back PurflingBlack/White fiber
Back Center StripZipper pattern
End WedgeFigured Maple
RosetteClaro Walnut ring with BWBBWB outer purfling rings, black fiber frame
FretboardBrazilian Rosewood — 16" radius, diamond MOP inlays
Headstock VeneerBrazilian Rosewood
LogoBlack African Rosewood hawk in MOP moon
BridgeBrazilian Rosewood — Martin style, 16" radius, saddle slot routed on guitar with Stewmac jig
NeckLMI long-scale pre-made neck with matching heel block
Pore FillZ-Poxy (back, sides, rosette ring, headstock veneer)
FinishShellac wash coat + EM6000 sprayed — 16 coats back/sides, 10 coats top
Air Resonance~95 Hz
Top Resonance~170 Hz
.jpg)
.jpg)
.jpg)
.jpg)
.jpg)
.jpg)
.jpg)
.jpg)
.jpg)
.jpg)
.jpg)
.jpg)
.jpg)
.jpg)
.jpg)
.jpg)
.jpg)
.jpg)
.jpg)
.jpg)
.jpg)
.jpg)
.jpg)
.jpg)
.jpg)
.jpg)
.jpg)
.jpg)
.jpg)
.jpg)
.jpg)
.jpg)
.jpg)
%203.jpg)
%201.jpg)
%202.jpg)
.jpg)
.jpg)
.jpg)
.jpg)
.jpg)
.jpg)
.jpg)
.jpg)
.jpg)
.jpg)
.jpg)
.jpg)
.jpg)
.jpg)
.jpg)
.jpg)
.jpg)
.jpg)
.jpg)
.jpg)
.jpg)
.jpg)
.jpg)
.jpg)
.jpg)
.jpg)
.jpg)
.jpg)
.jpg)
.jpg)
.jpg)
.jpg)
.jpg)
.jpg)
.jpg)
.jpg)
.jpg)
.jpg)
.jpg)
.jpg)
.jpg)
.jpg)
.jpg)
.jpg)
.jpg)
.jpg)
.jpg)
.jpg)
.jpg)
.jpg)
.jpg)
.jpg)
.jpg)
.jpg)
.jpg)
.jpg)
.jpg)
.jpg)
.jpg)
.jpg)
.jpg)
.jpg)
.jpg)
.jpg)
.jpg)
.jpg)
.jpg)
.jpg)
.jpg)
.jpg)
.jpg)
.jpg)
.jpg)
.jpg)
.jpg)
.jpg)
.jpg)
.jpg)
.jpg)
.jpg)
.jpg)
.jpg)
.jpg)
.jpg)
.jpg)
.jpg)
.jpg)
.jpg)
.jpg)
.jpg)
.jpg)
.jpg)
.jpg)
.jpg)
.jpg)
.jpg)
.jpg)
.jpg)
.jpg)
.jpg)
.jpg)
.jpg)
.jpg)
.jpg)


